
How to use Ableton Live 10 | Step by Step Tutorial (2022)
What is Ableton Live 10?
Ableton Live 10 is an incredibly powerful, versatile DAW (Digital Audio Workstation) that has, in recent years, become one of the most popular DAWs out there.
Ableton is particularly popular with electronic or hip hop producers. This is mainly due to it’s Session / Arrangement layout, it’s intuitive, rapid interface and outstanding MIDI capabilities.
Whether you’re complete music production beginner, or you’re an advanced producer looking to try out a new DAW, Ableton can seem quite intimidating at first. In fact, from my experience, trying out any new DAW for the first time can be overwhelming – especially if you’ve no idea what you’re doing.
Ableton Live Tutorial
Thankfully, Ableton’s learning curve really isn’t that steep.
It just takes some time, patience and guidance.
That’s where I come in. In this guide I will break down how to use Ableton from a beginners perspective, and simplify the process of learning and understanding the basics of this incredible program.
So let’s get started…

Article sections:
1. The 3 Main Sections of Ableton
3. The Top Bar
1. The 3 Main Sections of Ableton
Before diving too deep into the details of Abletons interface, it’s important that we take a look at the basic layout.
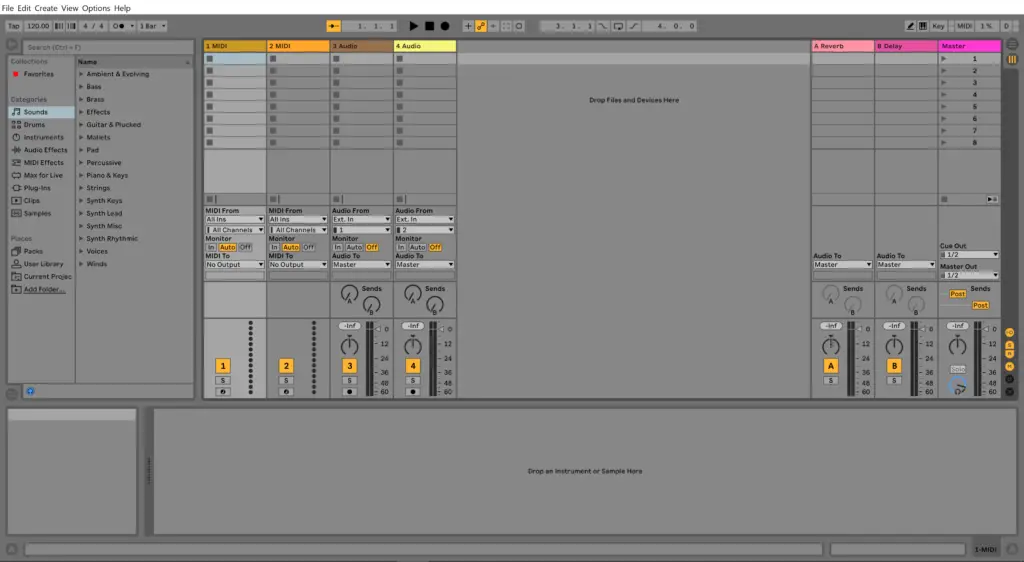
Ableton Live 10’s interface can be broken down into 3 main sections: the browser, the session/arrangement section, and the detail section.
The Browser Section
On the left of the screen, you’ll see the browser section of Ableton.
This is where all the factory sounds, samples, effects and plugins that come with Ableton Live are stored. You’ll also use it to browse and access your own files, but more on that later.
Think of the browser section as your palette, where you’ll choose the brushes, colours and shades to create your sonic masterpiece.
Make sure you familiarise yourself with the various categories. For example, the Sounds category has numerous sub-folders containing synths, pianos, voices, strings and many more sounds.
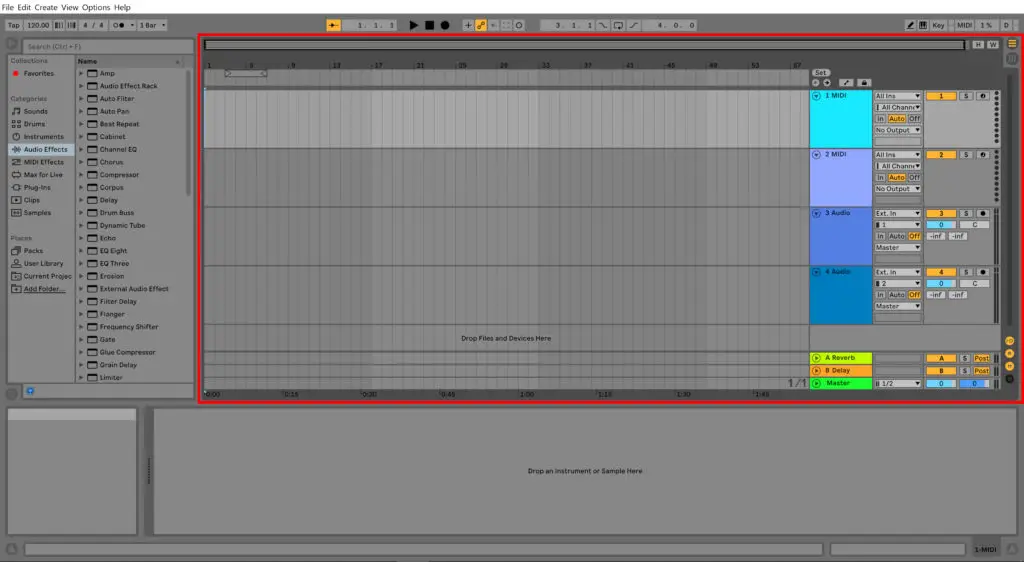
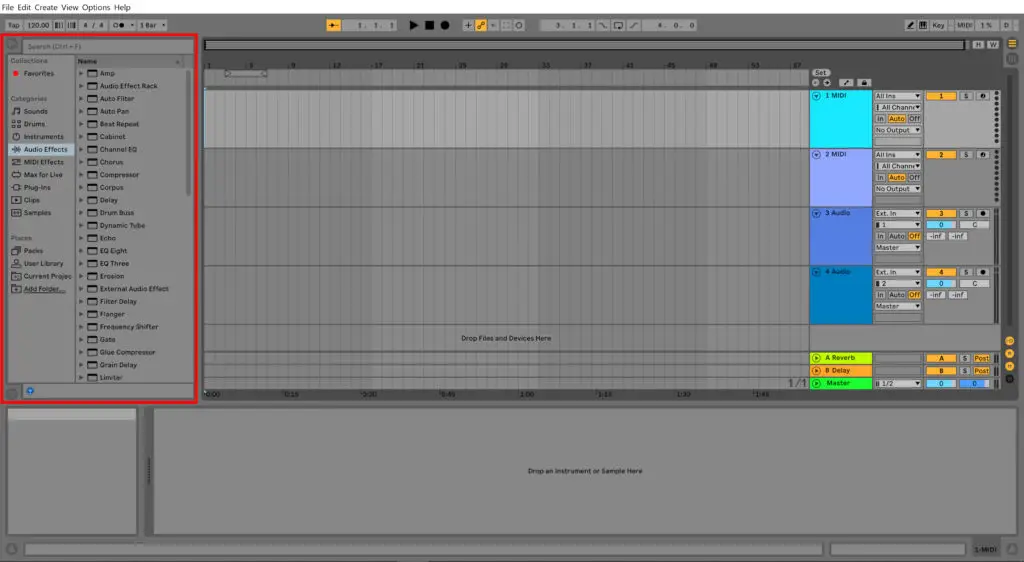
Session / Arrangement view
One of the things that makes Ableton Live so unique is the session and arrangement views. To put it simply, these are the two ways Ableton allows you to view and interact with your track.
To toggle between the session view and the arrangement view, press the tab button.
To go back to my earlier analogy, if the browser section is your palette, the session / arrangement view is your canvas.
Session View: The session view is the default view when you open a new project file, and your audio and MIDI tracks are shown vertically.
This view is primarily designed for live sessions and performances, allowing you to build loops in real-time and record over your loops.
Arrangement View: The arrangement view gives a horizontal representation of your channels, and will allow you to actual create, arrange and flesh out a full track. This is the view you will probably spend the majority of your time in.
Essentially, the session view is for jamming, the arrangement view is for songwriting.

The Detail Section
Along the bottom of Ableton, you’ll see the detail section.
This part of the interface is used for a number of different editing functions. These include editing MIDI patterns in the piano roll, manipulating your audio files or editing sounds and preset parameters.
I don’t want to touch too much on this section for now as it’ll only confuse things. We’ll take a closer look at what the detail section can be used for later in this guide.
2. How to use Ableton: Tracks (The Basics)
For this guide, we’ll be focusing on the arrangement view in Ableton, as this is where you will build and compose your tracks.
Let’s take a closer look at the audio and MIDI tracks within the arrangement view.
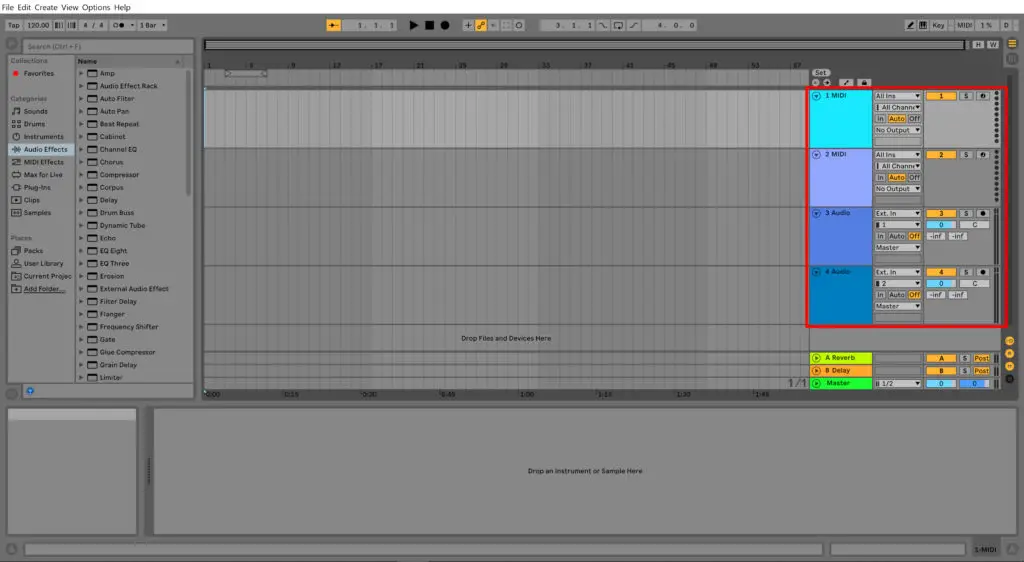
Along the right side of the arrangement view, Ableton starts you off with 2 MIDI tracks and 2 audio tracks.
MIDI tracks are where you draw melody or chord patterns that your virtual instruments can then play. MIDI sequences can either be drawn in manually within the DAW, or programmed by an external device such as a MIDI keyboard.
Audio tracks are where you can drag and drop your .mp3’s, .wav’s or any other pure audio file.
Adding or removing tracks
These tracks can easily be deleted by simply clicking on the track name and hitting delete on your keyboard, or right-clicking the track name and clicking the delete option.
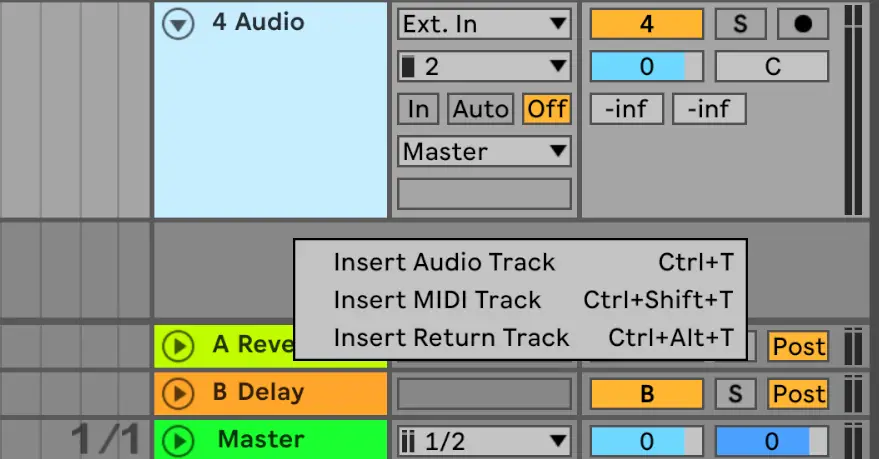
To add a new audio or MIDI track, simply right-click within the blank space just below the tracks and hit either Insert Audio Track or Insert MIDI track.
Renaming / coloring tracks
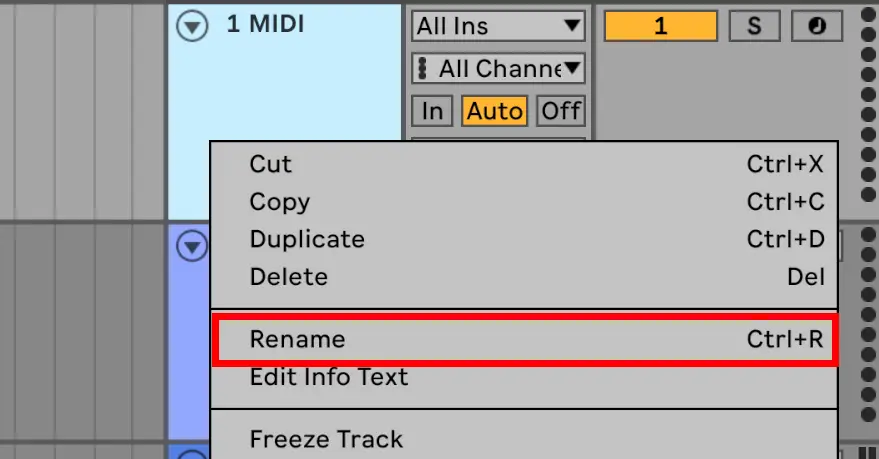
To rename a track, right-click the track name and hit rename. Alternatively, if the track is already highlighted, press cmd+R (Mac) or ctrl+R (Windows).
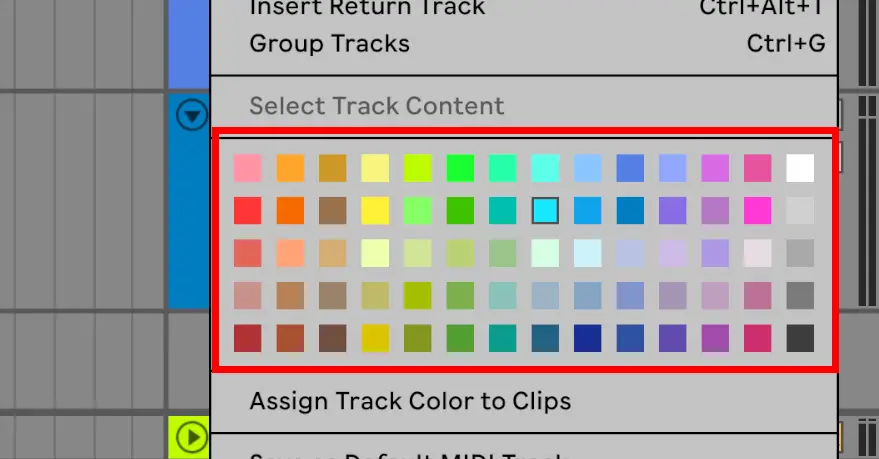
To change the color of a track, right-click the track name and in the options window you’ll see a color palette where you can select any color you like.
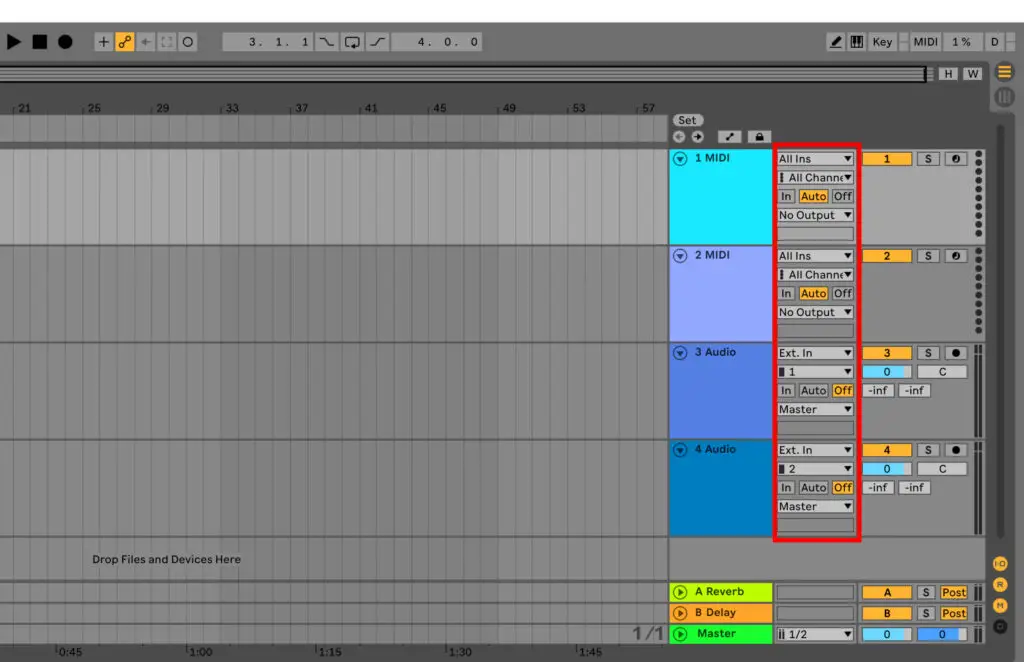
Input / Output controls
For the purpose of this guide, I’m not going to dive too deep into these controls, as they’re mainly used to connect external instruments or MIDI controllers.
For example, if you wanted to record vocals, this is the section where you’d select which track you’d want to directly record the vocal audio onto (and from which audio source).
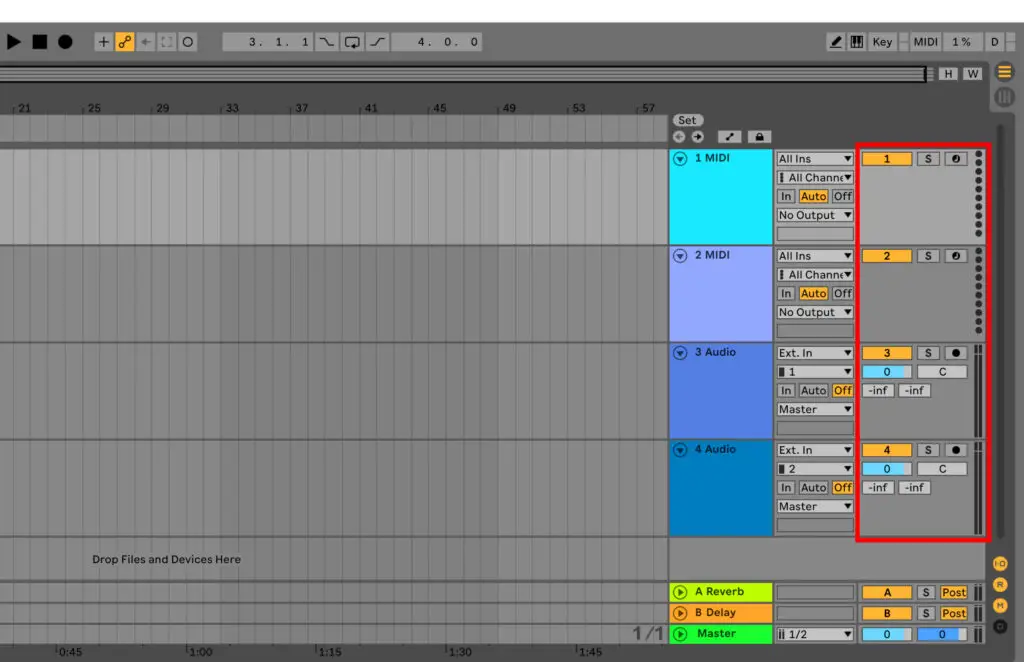
Additional controls
There are a few additional controls on the far right side of your track that definitely need to be noted.
The wide, yellow bar on each track essentially displays whether the track is playing. If the button is yellow, the track is on. By clicking the button, it will turn grey, meaning the track is muted.
The “S” button can be used to solo a track so that it is the only track playing. When the button is blue, the track is solo’ed. This is helpful for isolating a sound in order to finetune an effect or parameter.
The far right button is used to arm the track for recording. If you have a MIDI controller or audio source connected to Ableton, clicking this button tells Ableton you want the audio or MIDI information to go into the selected track.
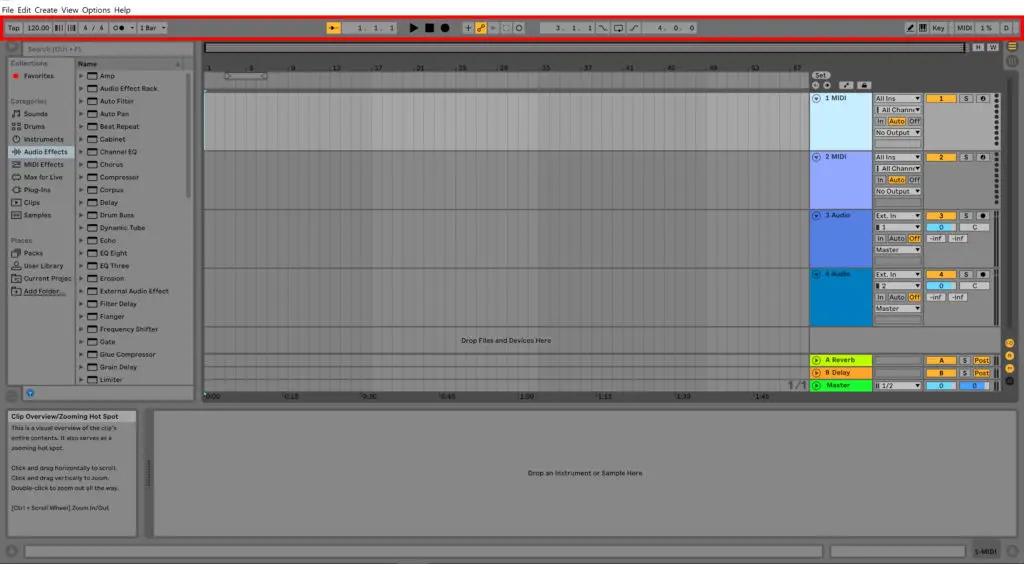
3. How to use Ableton: The Top Bar
Along the top of Abletons interface, you’ll see a number of controls that will very important when it comes to making your first track.

Tempo
At the far left of the top bar, you’ll see a “Tap” button alongside the tracks BPM (which is set to 120.00 by default).
The BPM is essentially the speed or tempo of your song, and has a huge impact on the feel, groove and style of a track.
- For Example, house music is usually set to around 120 bpm – 130bpm, whereas trap is usually set between 60 bpm – 75 bpm.
To change the BPM of your track, simply click and drag within the BPM section (where the default will say 120.00) to select a new value. Alternatively you can click within the box and type your chosen BPM.
The “Tap” button directly to the left of your BPM is a great feature of Ableton which allows you to “tap” a tempo (click your mouse on the tap button at a certain rhythm). This is very useful for beginners who aren’t yet familiar with different BPM values.
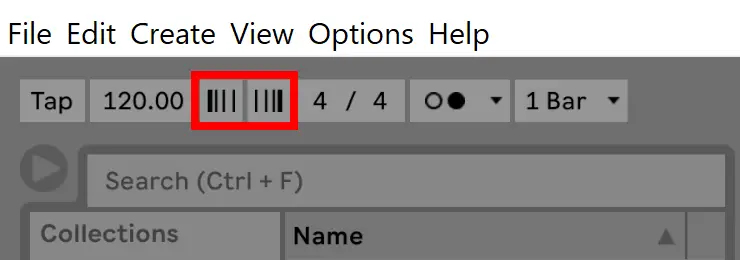
Phase Nudge Up / Down
These buttons temporarily increase or decrease the songs tempo to help you synchronise or “catch up” with an external source.
This is a great tool if you get out of sync while recording live and you want to temporarily speed up or slow down slightly to match the recording audio.

Time Signature
This section displays the time signature of your track. To change these values, simply click and drag each number or click and type.
If you’re a complete beginner to music theory, the time signature is effectively how many beats are in a bar. There’s a lot more to it than that, but for this guide that’s all you really need to know.
Generally speaking, most producers and beatmakers will almost operate within a 4 / 4 time signature. If you’re feeling adventurous, signatures such as 3 / 4 or 3 / 8 may be used.
Fun fact: Disclosure’s smash hit “Latch” is in a 6 / 8 time signature, which is pretty much unheard of in house music.
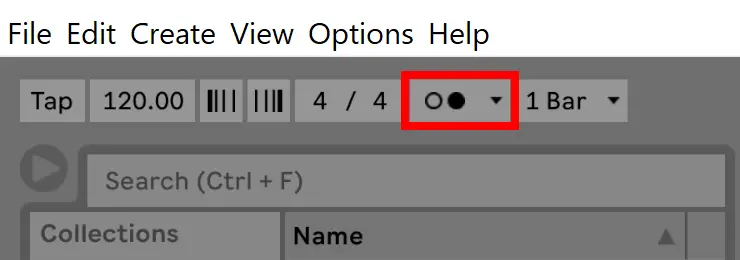
Metronome
When the metronome is selected (the button will turn yellow) you’ll hear a metronome sound on every beat while the song is playing.
This is incredibly useful when recording audio or MIDI sequences and you need to stay in time with the tempo of the track.
The small arrow within the metronome button will display a drop down menu, where you can select different metronome patterns, or change the sound of the metronome.
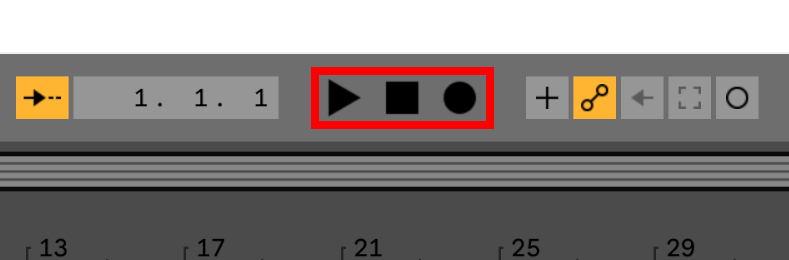
Play, Pause, Record
To be honest, you probably don’t need me to point these ones out (but I will anyway). The triangle is play, the square is stop and the circle is record.
There are various intermediate / advanced buttons around this section, such as MIDI arrangement overdub and a loop switch button. As this is a beginners guide, we won’t touch on these for now.
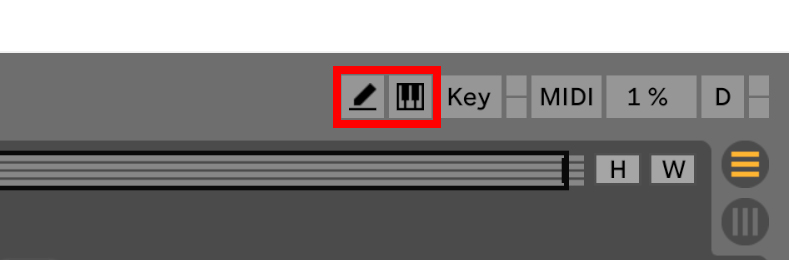
Draw and Computer Key tools
The last two buttons I want to draw your attention to in the top bar is the draw button (the small pencil on the left of the above image) and the computer key tool (the tiny keyboard button).
The draw button is particularly useful when drawing or editing MIDI patterns and sequences. When this tool is selected (yellow) you can use your mouse within the piano roll (below) to draw your MIDI pattern.
The computer key tool is a useful tool for beginners as it lets you use your computer/laptop keyboard as a MIDI keyboard to play simple chords or melodies.
So that’s a basic overview of the most important buttons in the top bar for beginners. I haven’t gone into any extreme detail here just because you don’t want to overwhelm yourself with information on functions you may never use.
Now we’ll take a look at how to use Ableton to actually make music.
4. Making a Track: MIDI
So, it’s finally time to start laying down some sounds. Before we get started, make sure:
– You are in arrangement view (the horizontal view). Click Tab to toggle between arrangement and session view.
– You’ve chosen a tempo by either selecting a value in the top left of the screen or tapping out a tempo. (Note: this can be changed later, but it’s probably better to decide before you start laying down too many track elements).
Adding a VST instrument
VST instruments are essentially plugins that generate audio and act as software-based instruments.
They often emulate recognizable sounds of famous synthesizers and other instruments. Luckily, Ableton Live 10 comes with some free, built-in, decent-sounding instruments and sounds to play around with.
To have a look through these default sounds, navigate to your browser categories (left hand panel), and browse the Sounds, Drums or Instruments categories.
Clicking the sounds will give you a preview of the sound. Once you have one you like the sound of, simply drag and drop into the top MIDI track in the arrangement view.
This MIDI track is now assigned to your chosen sound. Any MIDI patterns you program in this track will be played by your chosen sound / instrument.
If you want to add your own VST plugins / instruments, click here for our list of the 100 best FREE VST plugins.
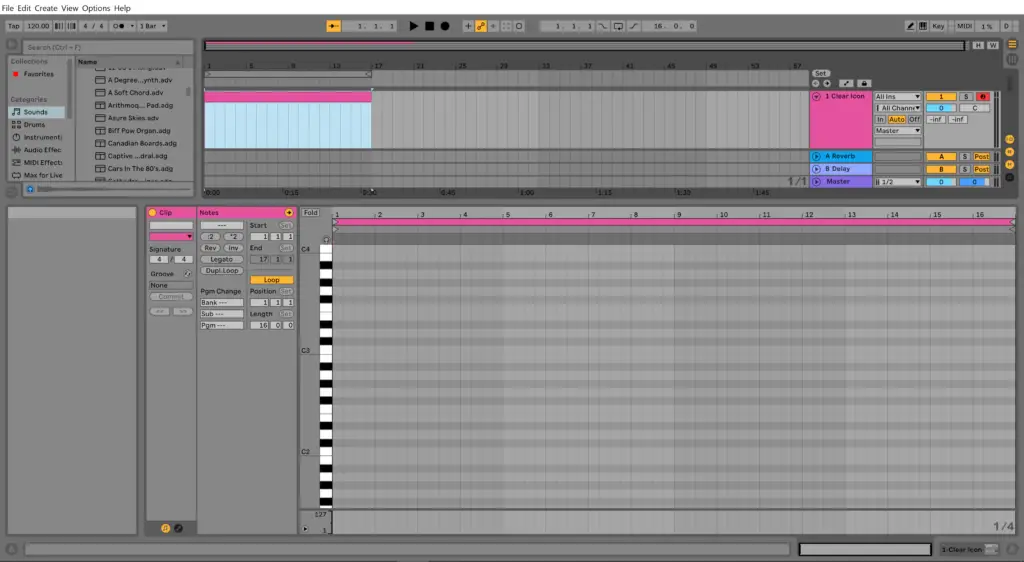
Adding a MIDI clip
The first thing you need to do in order to create a MIDI sequence for your chosen sound is create a MIDI clip.
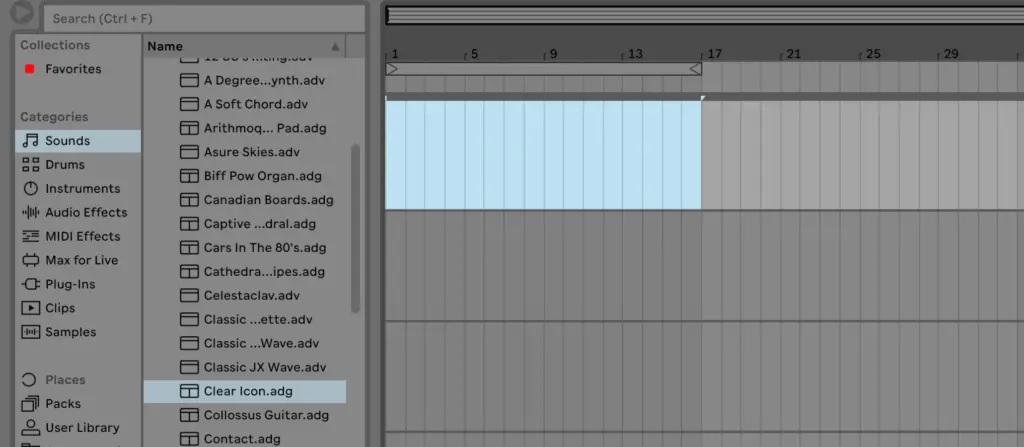
To do this, click and drag within the track display to however long you want the MIDI clip to be. In the above image I’ve selected 16 bars.
Then right-click and select Insert MIDI clip(s). This will transform your selection into a colored MIDI clip which you can now edit.
When the MIDI clip is created, a piano roll will pop up in the detail section at the bottom of the screen. This is where you can create your MIDI patterns.
Adding a MIDI sequence
Now you have your created MIDI clip, navigate to the piano roll in the bottom section of the screen.
At the moment, the piano roll is probably a little thin to comfortably navigate. You can expand the piano roll area by dragging it up from the top to your preferred size.
Creating a MIDI sequence in the piano roll

Before trying to create any MIDI sequences, make sure the draw button is selected in the top right corner of Ableton.
Ableton’s piano roll is extremely quick, powerful and intuitive. Whether you’re creating simple melodies or detailed, complex chord progressions, the process is very straight-forward.
Simply click within the piano roll to create notes, click the note again to delete it, and drag the edge of the note to shorten or lengthen it.
Now is a good point to take some time to play around with the piano roll. Even if you’re a complete newbie to MIDI or music theory, you can play around and experiment with different patterns to create something cool.
Here’s a 4 bar chord sequence I made earlier…
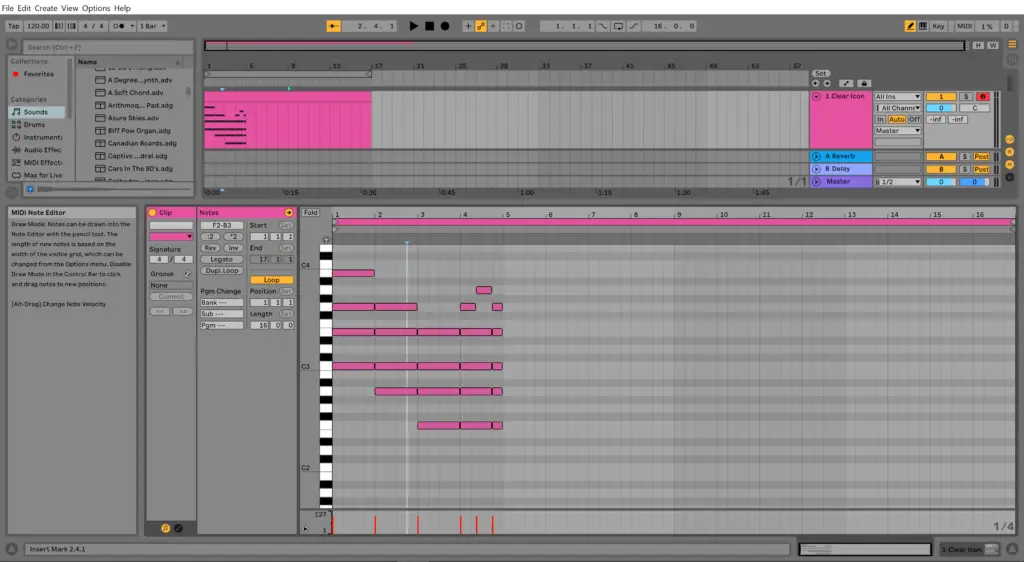
You’ll notice that when you input MIDI notes into your piano roll, they are reflected in the corresponding track view above. So now you should hear these notes during playback.
This process can be repeated as many times as you like with various instruments, just make sure each instrument is set to a specific track. Repeating this process will allow you to layer your track and create overlapping sounds and instruments.
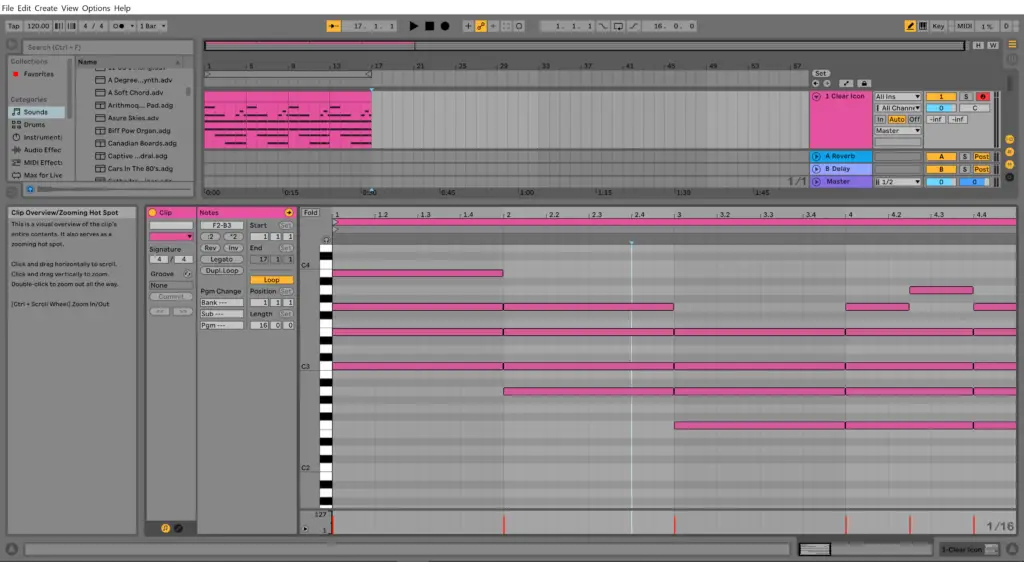
Repeating a pattern
I’ve purposefully only sequenced a 4 bar chord progression in a 16 bar MIDI clip, just to explain how easy this is to fix.
Simply click and drag the edge of the MIDI clip in the arrangement view so that the MIDI clip only contains your inputted notes.
Then, to repeat / duplicate this pattern, right click and press Duplicate, or highlight the clip and press Ctrl + D.
This will duplicate the MIDI clip sequentially along the track, and will look something like this.
5. Making a Track: Effects
Adding an effect can completely transform an instrument or sound. For example, even a reverb can transform something dull and ordinary into an interesting, spacious, reverberating sound.
The process of adding effects on Ableton is extremely easy and intuitive. Ableton comes with a wide selection of built-in effects such as EQ’s, reverbs, delays, flangers, vocoders, pedals and many many more.
However there are a huge amount of third-party VST effect plugins you can find on the web. Click here for our list of the best 100 FREE VST effects and instruments of all time.

Choosing an effect
To choose an effect, navigate to the browser (section on the left-hand side of screen), and into the category Audio Effects.
Here you will find countless effects, each with various labelled effect presets.
Choose an effect / preset you like the sound of, and simply drag it into your chosen track. This will bring up a effect editor in the bottom detail section of the screen in which you can edit and manipulate your chosen effect to your hearts desire.
For this guide, I’ll be adding the reverb preset: “Cathedral”.
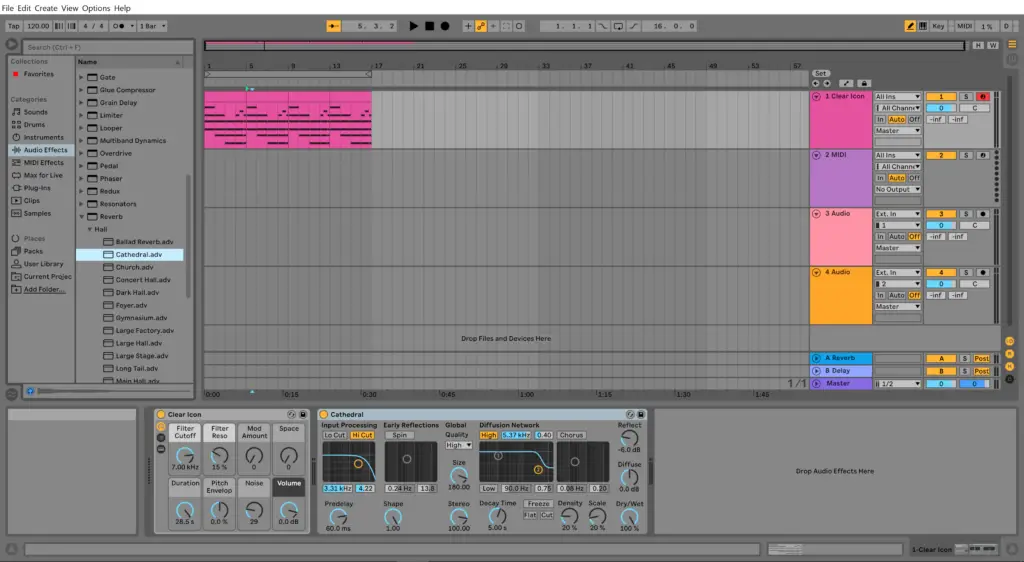
Editing an effect
As you can see, the reverb editor window has appeared in the bottom detail section of the screen.
The effect editor interface will largely depend on what effect you’ve added to your sound.
The editor will have various buttons, knobs and modulation controls to manipulate the effect in any way you like.
For example, in the reverb editor, you have buttons such as:
– Decay Time: This determines how long the reverb tail lasts for.
– Density: This controls whether you want a dense sounding reverb or a thinner one.
There’s so many built-in Ableton effects to choose from, each with an impressive range of presets and editable controls. Have a browse with various effects, and try adding some to instruments and sounds and see what you can come up with.
The Tip of the Iceberg…
So now you have an understanding of the basic layout of Ableton, what the important controls are and how to use them. You also have an understanding of how to select an instrument and add an effect to it.
As you’ve probably guessed, these are the absolute basics of Ableton Live 10, and there’s so much more to this incredible program that I couldn’t possibly fit into one guide.
One of the biggest pieces of advice I give to beginner producers is one step at a time. Don’t get ahead of yourself. There’s no point diving into sound design or complex automation clips when you don’t even know how to use the piano roll.
So make sure you have a good understanding of these fundamentals of the software first. Then you can explore the next stages of Ableton, and begin creating your masterpieces.
Good luck!