
How to use Massive (For Beginners) | 2022 VST Plugin Tutorial

For well over a decade, Native Instruments’ heavyweight soft synthesizer Massive has remained one of the most popular, highly acclaimed VST plugins on the market. Nowadays it is ubiquitous in the world of music production, and is an iconic plugin for a broad scope of electronic genres.
Massive can definitely be seen as a “modern hybrid” synth. The engine features an impressive amount of waveforms, filters and modulators, encompassing various forms of sound design, with a gorgeous, intuitive interface.
Don’t fall into the trap of thinking Massive is only capable of creating harsh, resonant, dubstep-style sounds (as some people would have you believe). This wavetable synthesizer can create just about any sound you can imagine, from lush, evolving pads, to subtle, percussive elements to the harsher, intense sounds it’s often associated with.
In my opinion, the breadth of creative scope and versatility of this incredible plugin make it one of the most powerful soft synthesizers of all time.
If you’re looking to learn how to use Massive, this tutorial will show you the most important components of the plugin, from a beginner’s perspective. We’ll break down and dissect these key elements, so you can get to grips with the power and sonic possibilities of this incredible plugin. Enjoy!
How to use Serum (2022 Tutorial): Jump to…
How To Use Massive (VST Tutorial For Beginners)
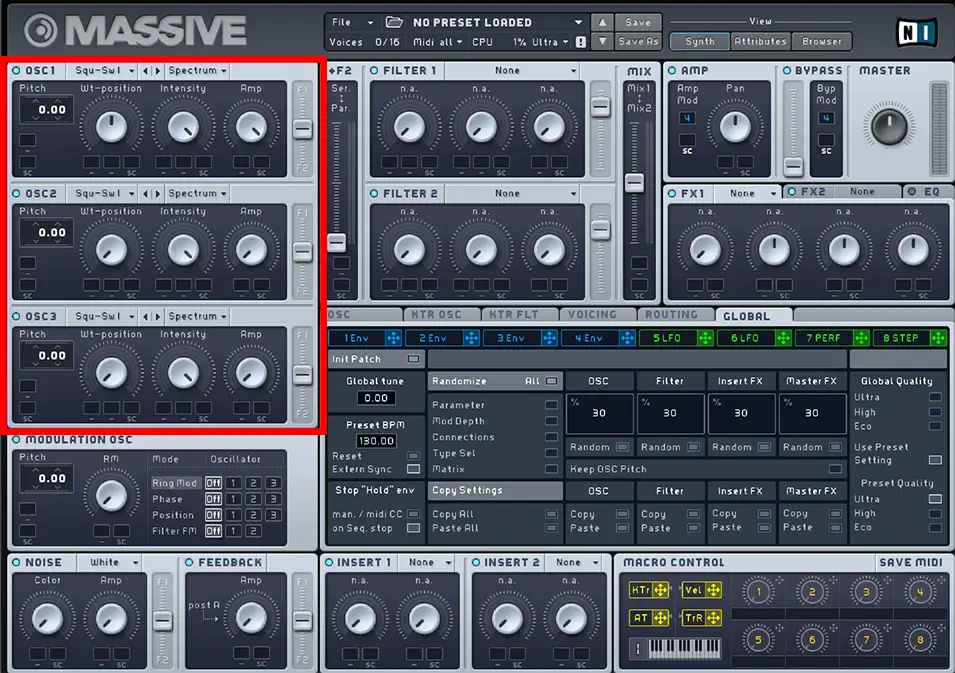
The 3 Main Oscillators
If you’re new to wavetable synthesizers, or sound design in general, it’s important to understand what oscillators actually are. Oscillators essentially play waves or wavetables (small waveform patterns such as sine or square waves) at a very high rate which produces a sound output. Wavetable synthesizers are built around this concept, and the oscillators will be the starting point of any sound you create with Massive.
So let’s take a look at the oscillator modules, and the options and parameters each one contains.
Massive has 3 main, independent oscillators, each of which is more or less identical. Each oscillator can be turned on or off using the small circular button to the left of the OSC heading text.
Wavetables
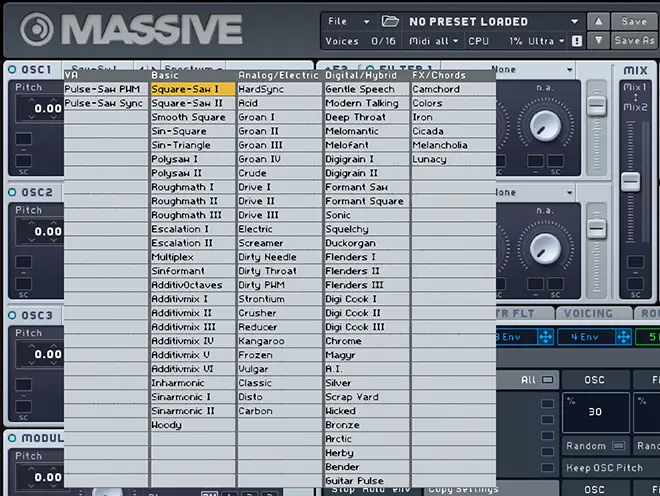
To browse the available wavetables for a given oscillator, click the drop-down menu to the right of the OSC text. This will bring up an eclectic selection of wavetables such as simple square-saw waves, to weirder examples such as modern talking and carbon.
Have a browse through these wavetables, as they will be the foundation of your sound. Bear in mind you can manipulate these sounds in countless ways within Massive, but it’s important to have an understanding of what type of base sounds are available here.
Pitch
The pitch of the oscillator can be edited by dragging the pitch value within the oscillator module. A common concept of multi-oscillator sound creation is to give a slightly different pitch value to each oscillator (e.g 0.00, 0.09, -0.06). This means the oscillators are pitched slightly apart, therefore differentiating them and “thickening” up the sound.
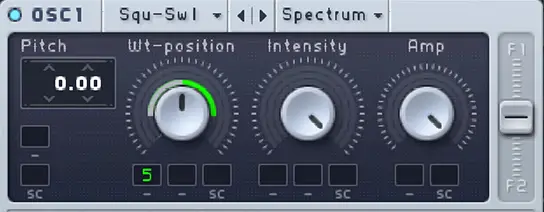
WT-position
Something that makes wavetable synthesis particularly powerful is the use of wavetable positioning. Massive allows you to choose where you are positioned on a specific wavetable.
For example, in the default square-saw wave, turning the WT-position knob will scroll between a square wave (full left rotation) and a saw wave (full right rotation. Think of it as scrolling through a 3D model of a wavetable. All the wavetable options in Massive work this way, and some have very bizarre, revolving effects when using the WT-position knob.
Intensity
The intensity knob in the oscillator section basically does what it says on the tin. It controls how intense or “resonant” your sound is, so it’s perfect for either dulling/smoothing or adding a little punch to your sound.
This control is actually dependent on the drop down menu directly above it. If Spectrum is selected for example, the intensity knob will remove higher harmonics, similar to a low-pass filter. There are a few other cool bend and formant options here to warp your sounds in various ways.
This feature becomes particularly useful when you start to involve modulation connections within Massive, which we will cover later in this guide.
Amp
This knob is a standard volume control.
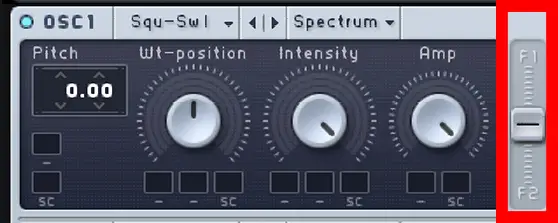
Filter Slider
This slider down the right side of the oscillator module controls the routing amount to the two built-in filters (directly to the right of oscillator 1 and 2. If these sliders are kept in the middle, the sounds won’t be affected by the filters. If the slider is all the way at the top, only filter 1 will affect this oscillator, and if it’s all the way down, only filter 2 will affect it. We’ll touch more on these filters later.
I’d strongly recommend experimenting with these three oscillators and getting comfortable with the module controls before moving on to the rest of the plugin engine. While these oscillators will be the bread and butter of your sound, they are just the tip of the iceberg when it comes to the amount of sound design options in Massive, so it’s important that you get them down early.
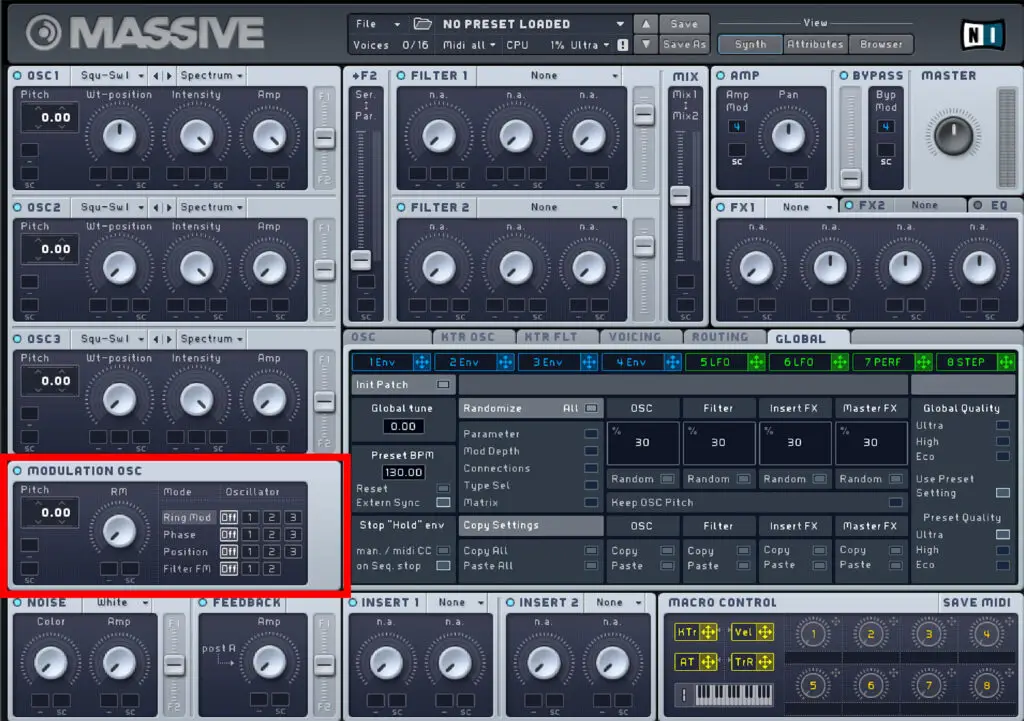
Modulation Oscillator
Next up, let’s take a look at the modulation oscillator in Massive. This option is located directly below your main 3 oscillators, and the main difference here is this oscillator doesn’t actually produce sound independently – it modulates the existing sound from the 3 wavetable oscillators.
This section has the modulation options: ring modulation, phase, position and filter FM. Each of these options can be assigned to a different oscillator, and each one can produce some interesting, highly creative modulation effects.
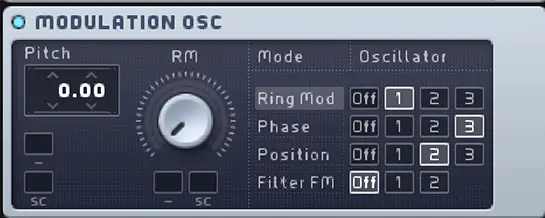
To add one of these modulation options to an oscillator, use the buttons at the right of the module. In this example, the ring mod is applied to oscillator 1, the phase mod is applied to oscillator 3, the position mod is applied to oscillator 2 and the filter FM is turned off.
Ring Mod: When the ring mod is applied to a specific oscillator, it creates a kind-of rapid tremolo effect. For the ring mod option, the pitch knob alters the speed of the tremolo, therefore completely transforming the character of the sound. The RM value determines the amount of ring mod that affects the sound.
Phase: This control adds a vibrato effect to a selected oscillator. The pitch knob alters the speed of the vibrato, while the phase knob alters the depth.
Position: This modulates the wavetable positioning of the oscillator. The pitch knob alters the position modulation speed, and the position knob alters how much the position modulates by.
Filter FM: This control modulates the Cutoff value in the filter section of Massive. This should make more sense once we take a look at the filter module later in this guide.
So this module essentially gives a quick, intuitive way of adding modulation effects to oscillators. It’s a comparatively simple section compared to the rest of the modulation options in Massive, but is a fantastic way to get to grips with basic modulation before diving into the rest of the Massive engine.
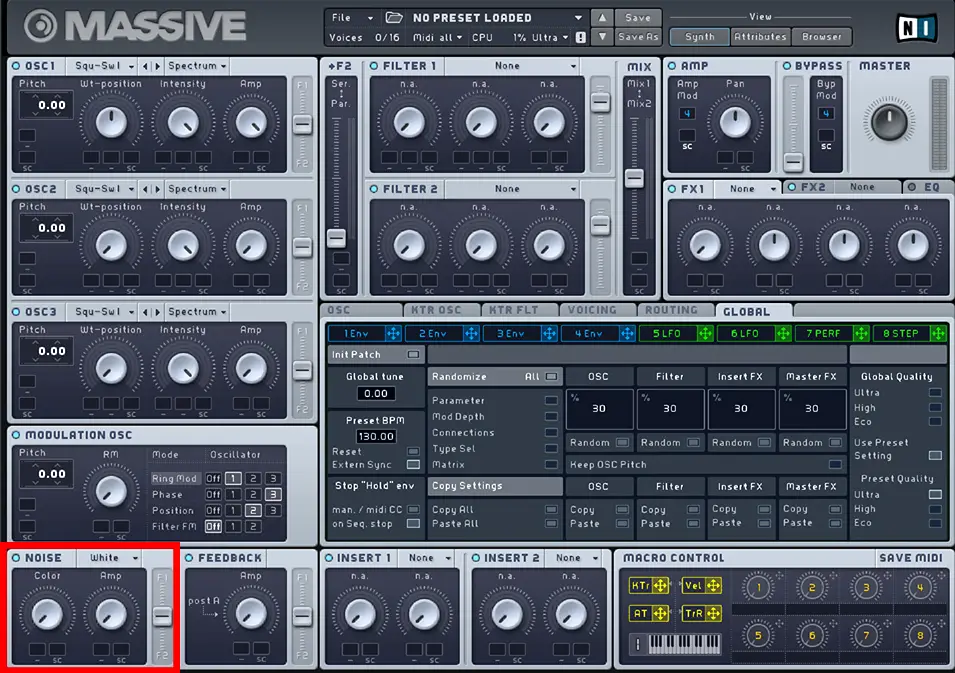
Noise
Adding noise in Massive is a great way to apply texture and sonic flourishes to your sound. Massive has a modest selection of noise samples to choose from, such as white noise, tape hiss, paper and water pipes.
This module is very rudimentary, with two fully automatable knobs: colour and amp.
The colour knob is dependent on the chosen noise sample, but generally speaking increasing the colour value makes the noise brighter and less filtered.
As always, amp controls to volume of the noise output.
There is also a filter slider in the noise module, meaning your chosen noise can be independently routed to the filter sections in the same way as the main oscillators.
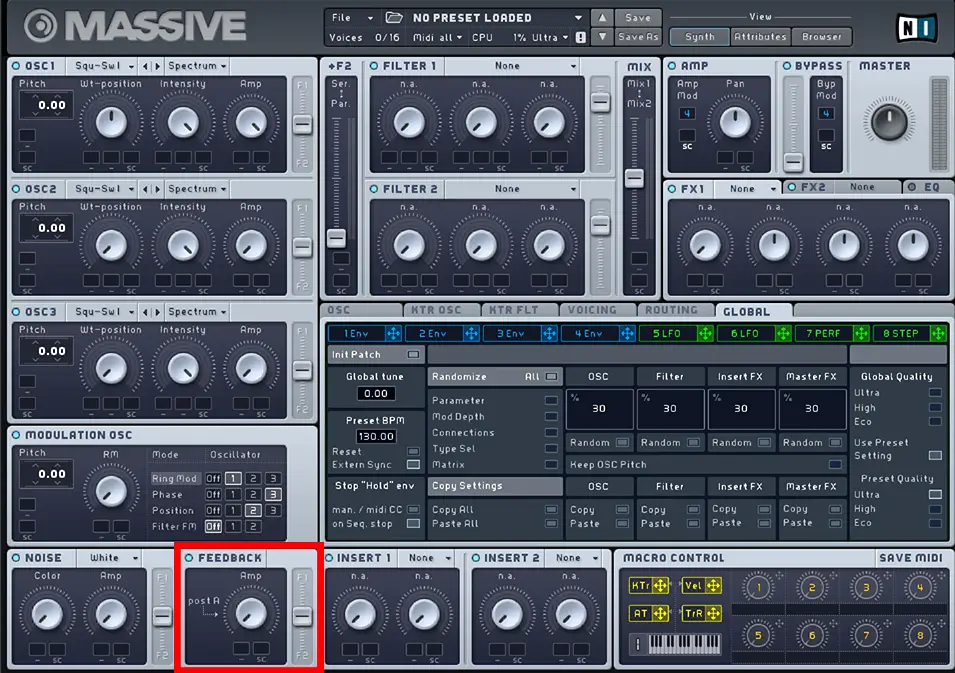
Feedback
Using the feedback module, you can take a portion of the sound and feed it back into itself, creating some very interesting distorted sounds.
Without getting too technical here, you can use Massive’s Routing tab (shown above) to define exactly where that feedback happens. There are a few buttons labelled FB within this section that determine this (shown below).
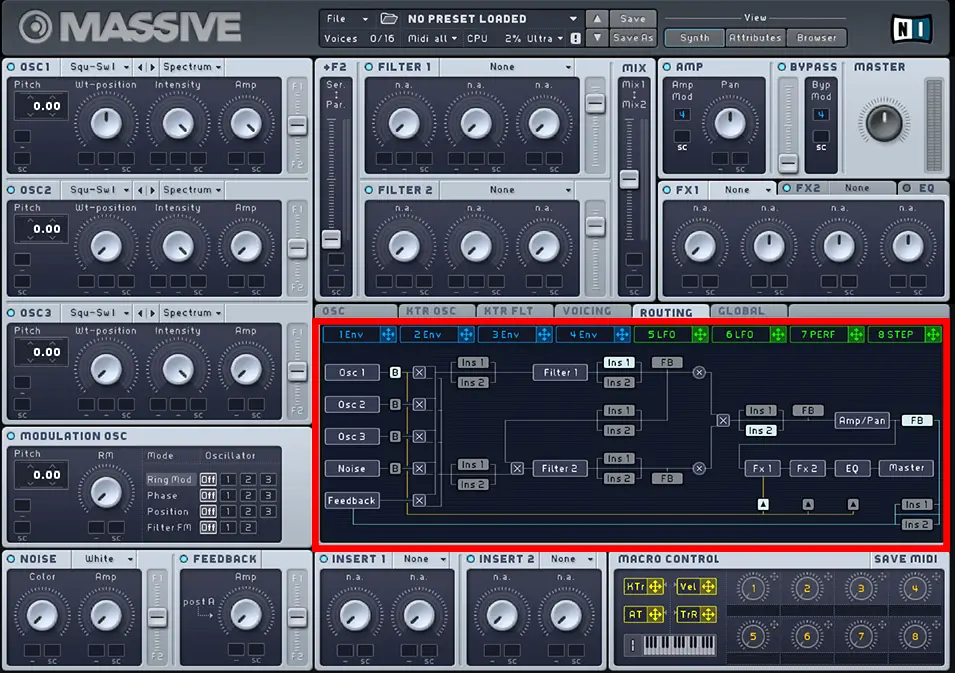
Essentially, whichever FB (feedback) button is highlighted, Massive will feed your sound back into itself from this point in the sounds routing. For example, if you highlight the far right FB option, you are routing the entire sound back into itself.
Massive’s feedback section has just one knob, an amp knob. This controls the amount of feedback the sound creates. When used heavily, this module can sound pretty terrible. However when you introduce modulation and other elements (which we will covered later), you can create some very unique, creative distortion effects.
So that covers the left hand column of Massive, the majority of which focuses on both independent and dependent oscillators. As always, you should definitely get to grips with these modules before moving on to the rest of the Massive interface. Learning how to modulate and add filters and envelopes to your sound is way easier once you have a good understanding of the fundamentals of Massive’s oscillators.
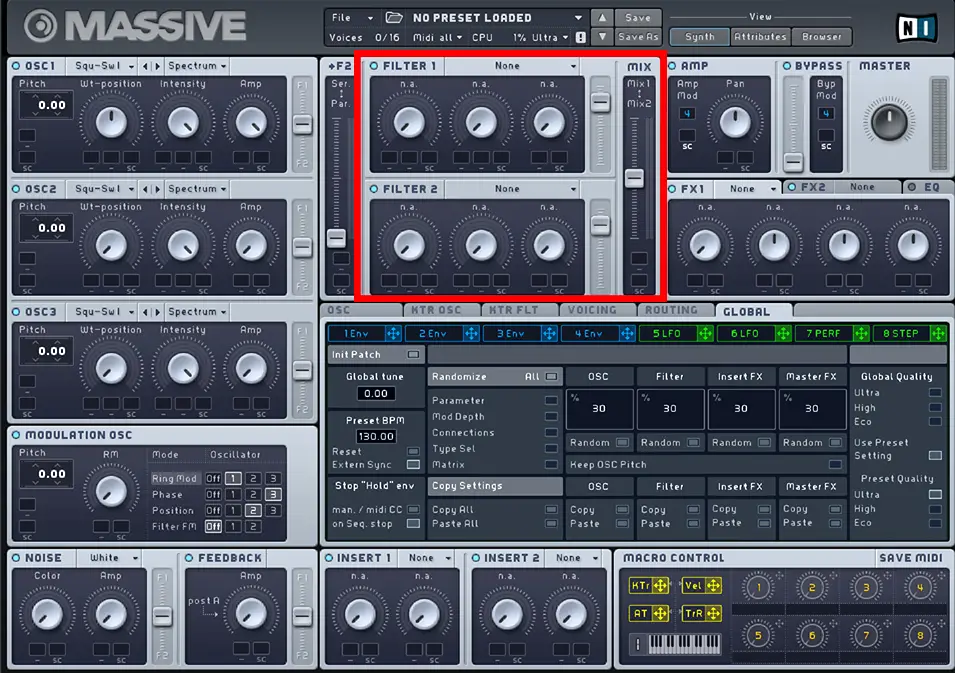
Filters
Now you have your oscillators down, you can move on to Massive various modules for manipulating your sound further. The first ones we’ll be covering are the dedicated filter modules. Like with all filter effects or plugins, filters adjust and warp your existing audio frequency, they do NOT create new frequencies.
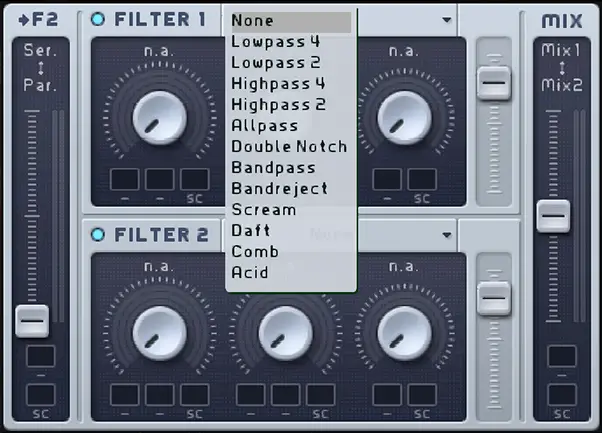
Massive has a fairly standard selection of low-passes, high-passes, an all-pass and a band-pass option. On top of this, there is a selection of filter types associated with Massive such as scream or daft.
In these sections, you have a Cutoff and a Resonance option. These work exactly how they would in a normal filter, and here their function is dependent on the filter type you’ve chosen. For example: the cutoff knob for low-pass will work completely different to the cutoff knob for the acid filter. I’m not going to go through each filter type, as it would definitely be more productive to experiment with each one yourself. But remember you are altering the frequency of your existing sound, not adding new sonic elements.
Going back to something I mentioned in the Modulation Oscillator section of this guide, the Filter FM option in the Modulation Oscillator section modulates the Cutoff value in the filter section. This is very simple, intuitive way of modulating phase on the cutoff value of the filter. (Note: this works for most filter types but not all!)
One thing that is worth mentioning here is that for certain filter types, the middle knob becomes available to adjust. For example, for band-pass and band-reject, a “bandwidth” knob becomes available, and for the scream option, a “scream” knob can be used.
These additional options add a whole other level of sonic potential, and it’s intricate details like this that really set Massive apart from other audio plugins.
Like the oscillator modules, each filter has a slider on the right hand side to control the level of the filter.
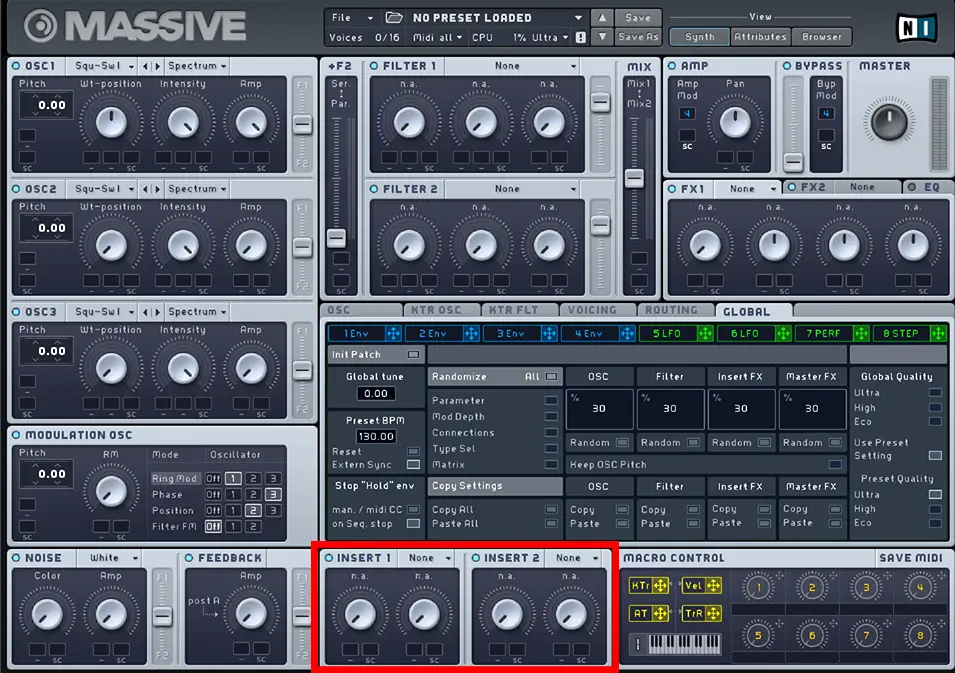
Insert effects
Effects within Massive can be categorized into two main modules: the insert effects modules and the master effect module.
The insert effects module can be inserted into various points in the audio routing tab. You can determine where the effects are inserted in a similar way to the feedback module. Open the routing tab, and light up the button Ins 1 or Ins 2 wherever you want to insert your effect. For example, placing the effect just after the oscillators will add the chosen effect to the sound generated by the oscillators, and then any subsequent filters or master effects will be applied afterwards.
If you’re a complete beginner, I wouldn’t get too bogged down with this. Usually, the placement of your insert effects doesn’t make an enormous difference to the final sound. For now I’d focus on learning how to create the effect itself, and worry about the routing aspect later.
The insert effect module has an eclectic range of effects such as a bitcrusher, a frequency shifter and a parabolic shaper. Again, I won’t go through each one individually, so experiment with each effect, and maybe have a play around with different routing inserts to see how your sound shifts slightly depending on its placement.
This module has two knobs, a dry/wet knob (how heavily the effect is applied to your sound) and a second knob which completely depends on which effect is selected.
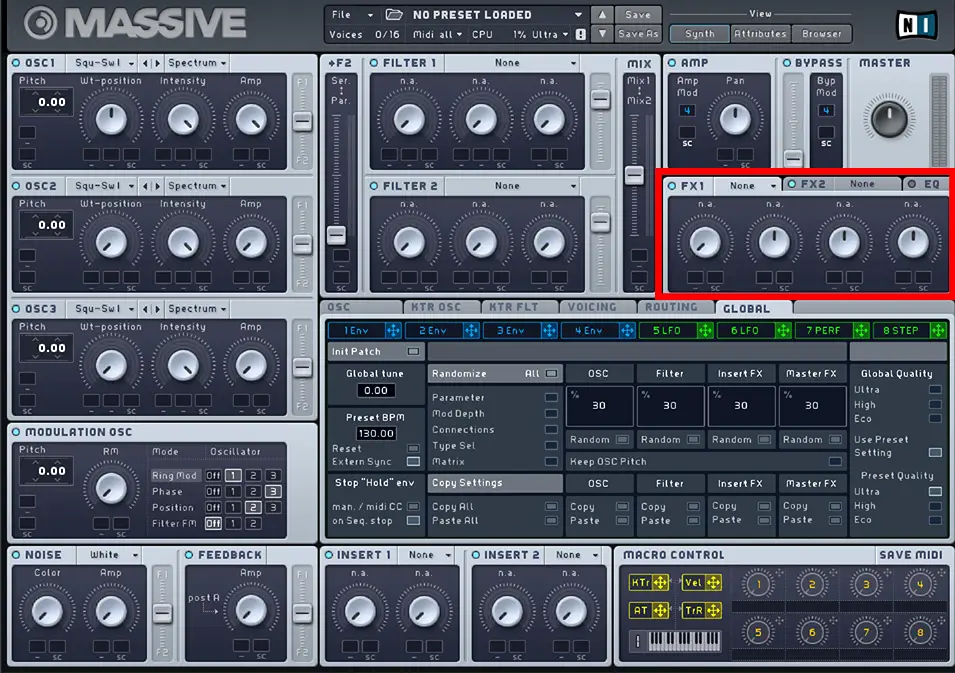
Master Effects
The other effect option in Massive is the master effect option. The main difference between this and the insert effect options is the master effects are applied to the entire sound.
Massive has two master effect slots, each with a fantastic array of available effects.

Using the top drop-down menus, you can select the effect you’d like to use, such as reverb, delay, a flanger and tube options. I’d recommend checking out the “dimension expander” option, which can result in some very vibrant, spacious sound effects. I’ve also always thought the reverb options in Massive were particularly impressive, especially for lush, long-tail reverb effects.
The knobs in this module are dependent on the chosen effect, and each effect has a decent amount of customization options for tweaking and fine-tuning your sound.
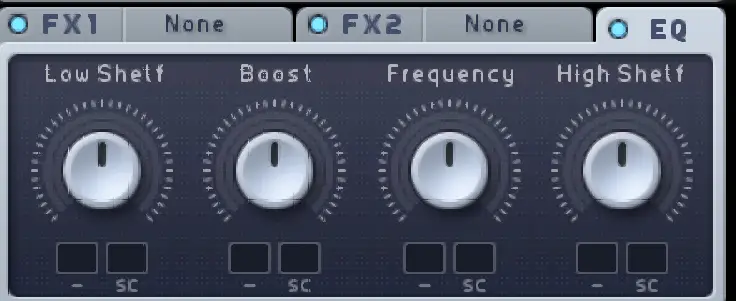
There is a third tab in this effect module dedicated to EQ, with low shelf, boost, frequency and high shelf parameters. Granted, it’s not the most expansive EQ module, but it works great for basic EQ’ing processes. For more in-depth ways to EQ your Massive sounds, check out our list of the best EQ plugins on the market.
How to Add Modulation
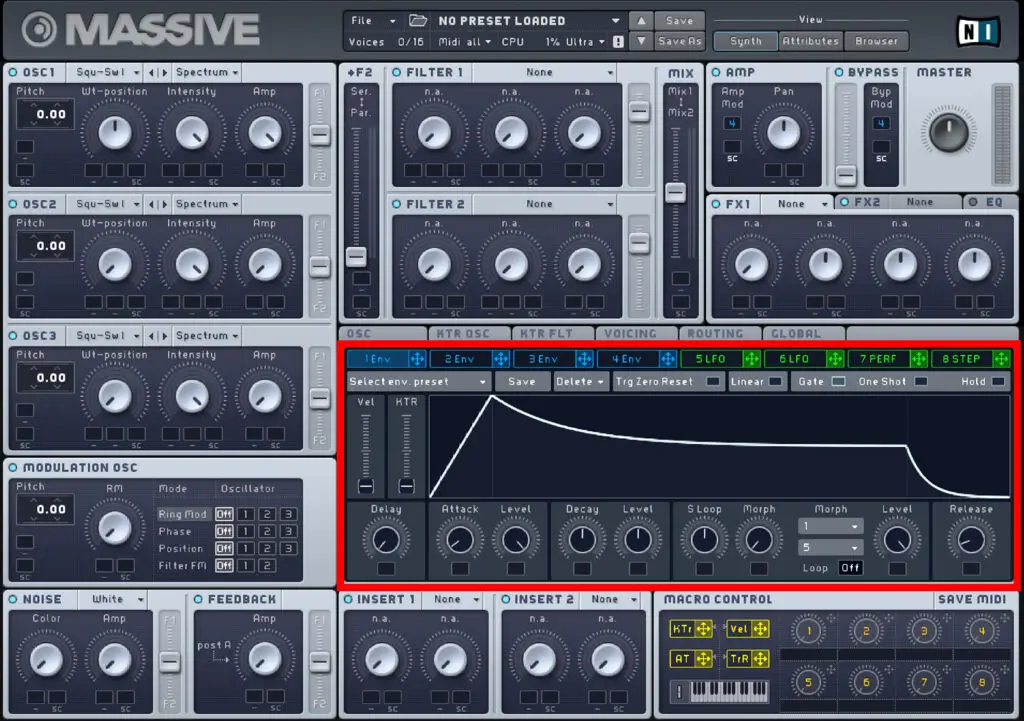
Pause. Take a breath – there’s been a lot of information to take in so far. This is a perfect half-way point to step back and summarize what you’ve learnt so far. The rest of this guide will be focusing on the various modulation and other options within the red highlighted area above.
The oscillators, noise, feedback, effects and filters are obviously powerful aspects of Massive’s engine. However, the most expansive creative possibilities come into play when you dive into the seemingly endless world of modulation options.
Make sure you have the above sections down before you move onto modulation, otherwise things may start to get a little overwhelming.

When experimenting with Massive, you may have noticed these small, dark boxes in almost every section of the interface. These are arguably one of the most powerful features in Massive, and can be used to link and control modulation options for specific parameters.
For example, click and dragging this green LFO tab onto a box under oscillator 1’s WT-position knob will link the envelope to the wavetable positioning of the oscillator, therefore modulating this knob.
By click and dragging within the small box (which should now display the number of the envelope or LFO within it), you can alter the depth of the modulation. Click and drag upwards to create a position modulation depth, and downwards to create a negative modulation depth.
You can also right-click within the box to remove or mute the modulation.
Now let’s move on and take a look at the modulation section within Massive, which will open up a whole other world of sound creation possibilities.
Envelopes
The first modulation option we’re going to explore is the envelopes. If you’re a complete beginner to audio envelopes, this is a great guide by teachmeaudio.com. Essentially, you are creating a automation path to determine how the level of a sound wave changes over time.
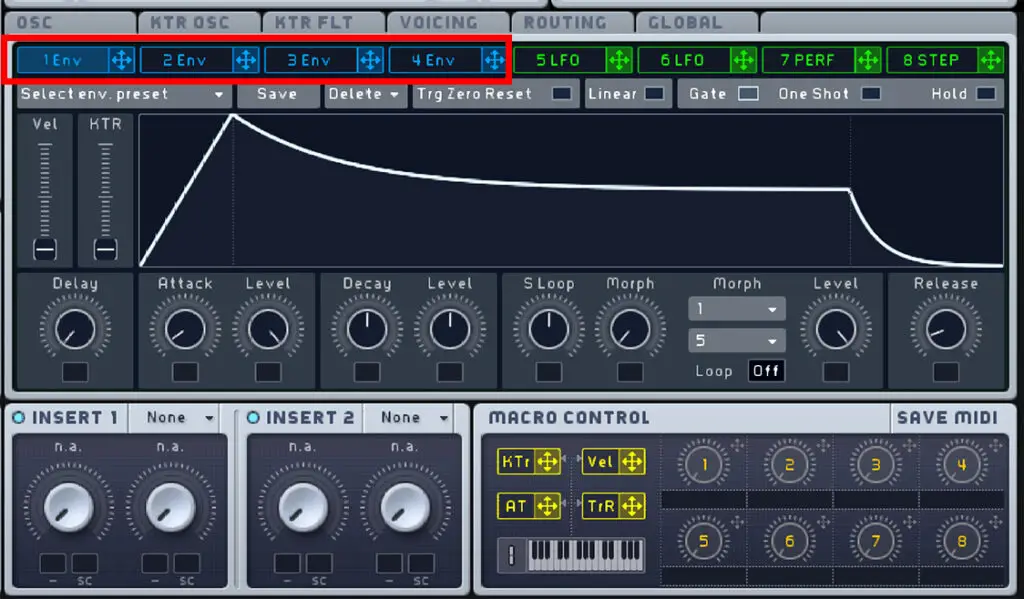
Massive has 4 available envelopes, and the interface is incredibly well designed to create and add envelopes to any parameter within the Massive engine.
Click on the blue tab of the first envelope labeled “1 Env” to open the view shown above.
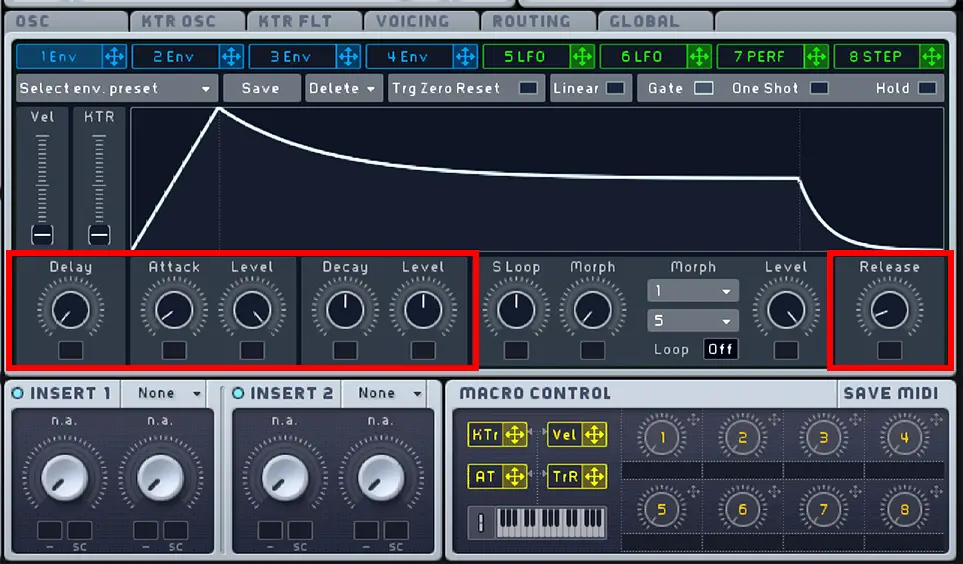
Along you bottom of the envelope window, you have the fairly standard delays, attack, levels and release controls. These can be used to edit the character and shape of the envelope. Try moving them to see exactly how each knob influences the envelope shape in the visualizer.
Adding envelopes to Massive parameters
Now you have your envelope shape, you can drag it into any small dark box in Massive to modulate that parameter.
For example, if the above envelope shape was added to an oscillator “amp”(volume) control, it would be a fairly sharp volume rise, a moderate peak, then a long sustain, then a sharp volume drop.
But the sky is the limit here. You can use envelopes to modulate wavetable position, filter cut-off, feedback, other modulations, and much, much more.
Envelope looping
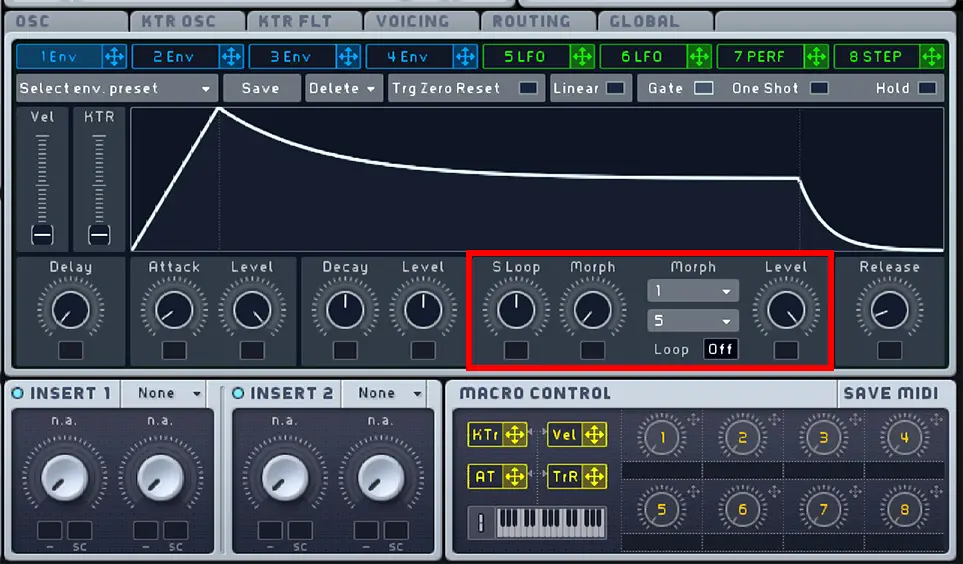
One thing I want to mention here is the option to loop specified parts of the envelope shape. Near the bottom right of the envelope section you should see a Loop button set to Off by default.
Using this draggable button, you can set a certain section of the envelope to loop either a set amount of times or infinite (Inf).
When a loop value is selected, the looped section will be highlighted within the envelope shape.
S Loop adjusts the length of the looped section.
Using the morph knob you can morph between two set envelope shapes with the looped section. Choose either one or two morph patterns using the two mini drop-down menus, and morph between them using this knob.
You can then use the level knob to set to level of the looped section in comparison to the rest of the envelope.
Try creating a bunch of envelope shapes, experimenting with various delay times and loops, and then try using these envelopes to modulate various knobs (remember to click and drag in the box to set a modulation range) and see what happens!
LFO’s
Next we’ll take a look at Massive’s LFO module.
LFO modulation is arguably one of the most powerful elements of Massive. If you don’t know what LFO modulation is, or need a refresher course, here is a great guide to LFO’s. It’s essentially a slow modulation or “change over time”.
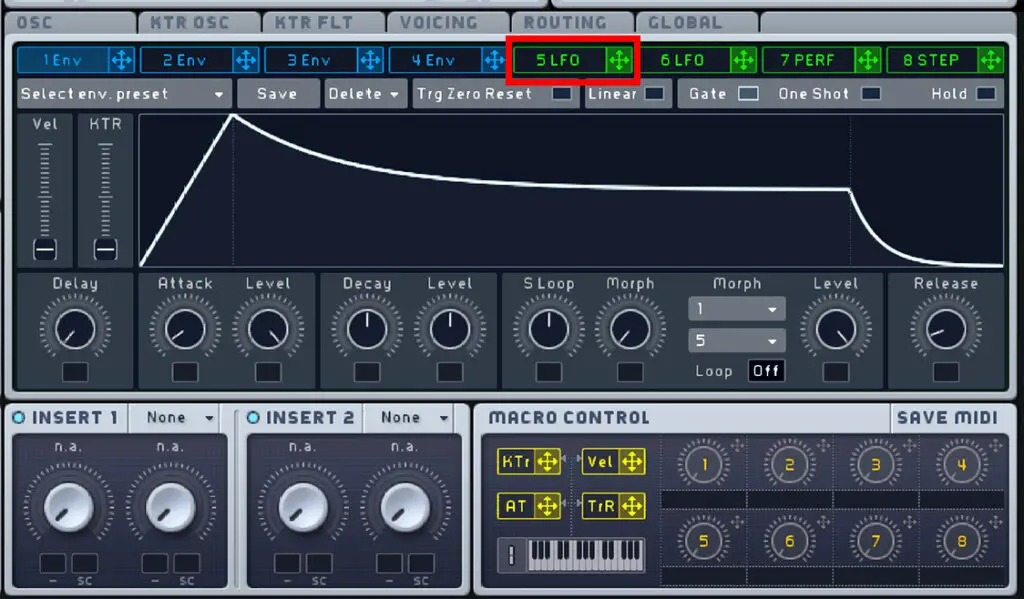
Probably the best way to demonstrate the function of an LFO is to drag one onto an active filter Cutoff knob (drag the green “5 LFO” tab onto the small grey box into the cutoff knob). This will modulate the cutoff of the filter (remember to make sure the filter is affecting the oscillators, and drag within the modulation box to add a green modulation range).
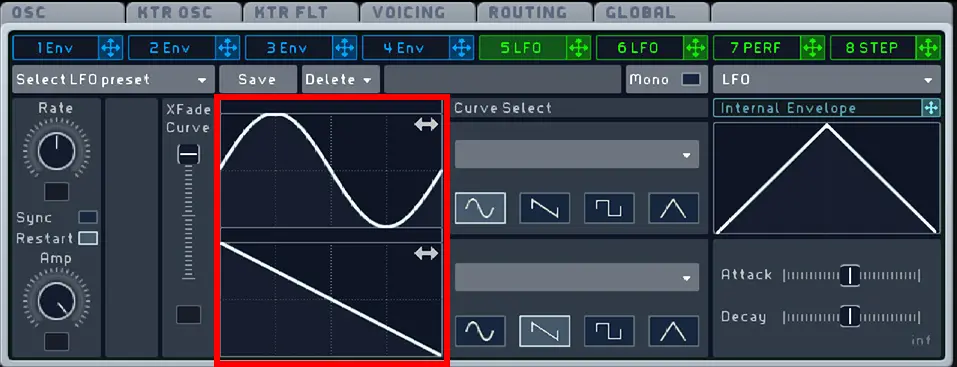
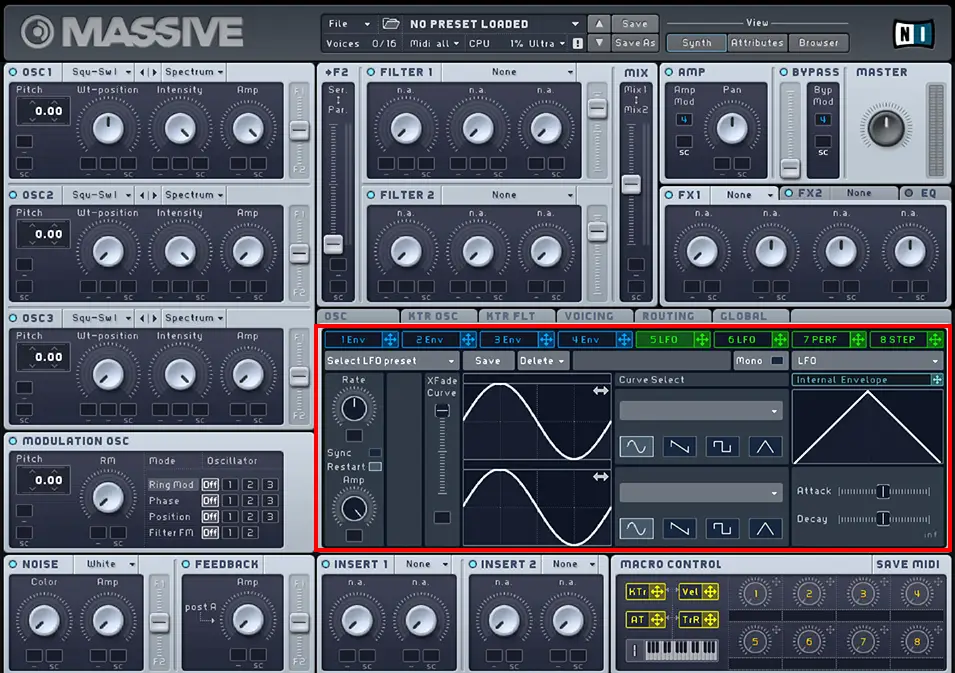
Setting an LFO shape
By default the LFO is set to modulate using two wave shapes simultaneously. For example, the above LFO is using a sine wave and a sawtooth wave, and will modulate using a combined results of the two shapes.
Dragging the XFade Curve will determine the amount of each wave shapes that is used. For example, dragging this all the way down means only the bottom saw tooth wave shape is active.
You can click and drag within the wave shape visualizer to set the phase of the LFO.
Using the curve select options you can choose between either the four default wave shapes; sine, saw, square and triangle, or you can select from a sizeable range of additional shapes using the drop down menu. There are a couple of strange, unique shapes in here, so I recommend having a good look through these options.
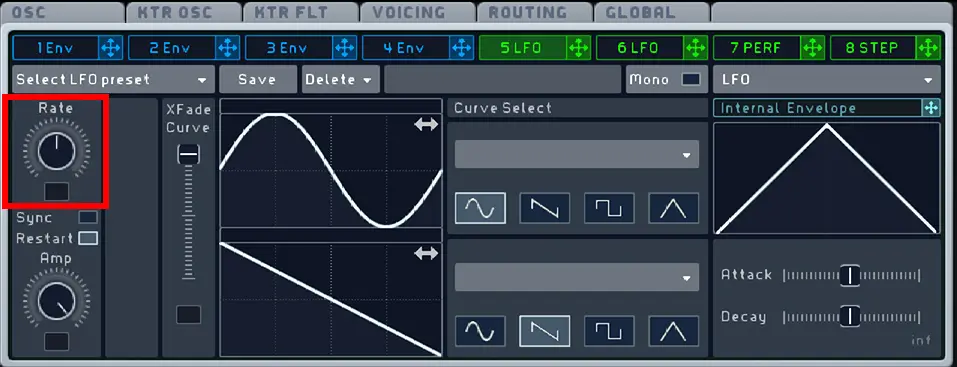
LFO rate
This rate control is extremely useful for choosing the speed of the LFO, which can either be independent or, by clicking the Sync button, will sync to your DAW tempo using LFO rate value.
The Amp knob is essentially a level control for the LFO.
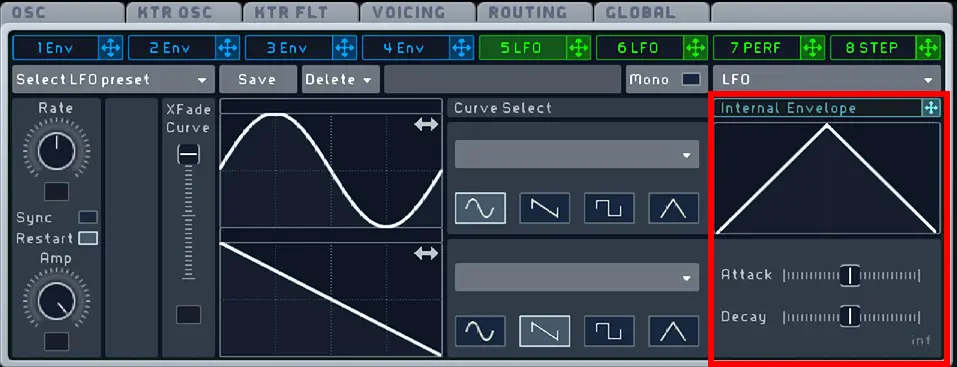
Internal LFO envelope
As I’ve said before, the beauty of Massive is in the level of detail and precision of the engine. One example of a feature in Massive that sets it apart from many other plugins is the LFO’s internal envelope.
To activate this, drag the Internal Envelope bar onto either the Rate, the Amp or XFade Curve options within the LFO module. This allows you to apply a simple envelope shape to these parameters, all within the LFO section of Massive.
For example, if applied to the LFO rate knob, this internal envelope shape will give a fast oscillation that quickly slows down to a slower rate.
Performer
Within the LFO module, there are two further modules that seem almost hidden away: the Performer and Stepper tabs.
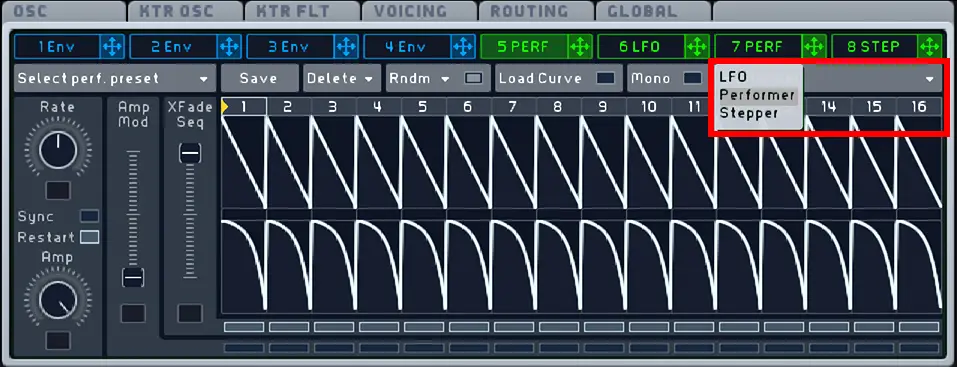
To access these, click the drop down menu highlighted above drop down menu and choose between LFO, Performer or Stepper.
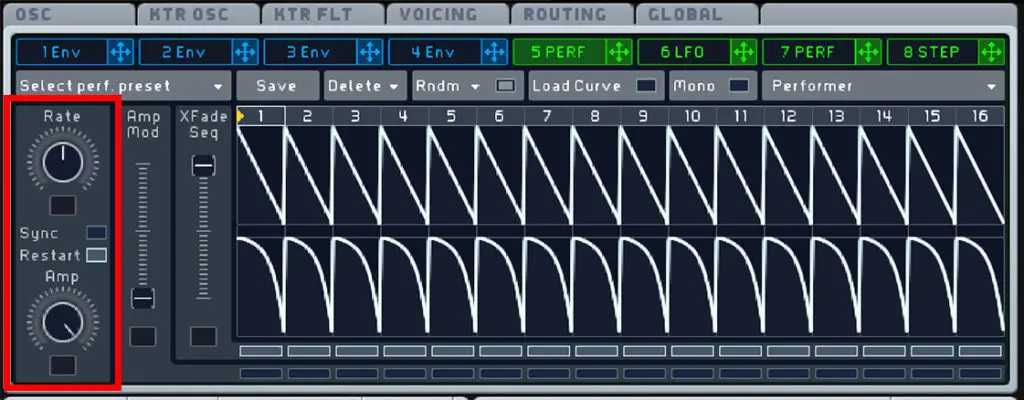
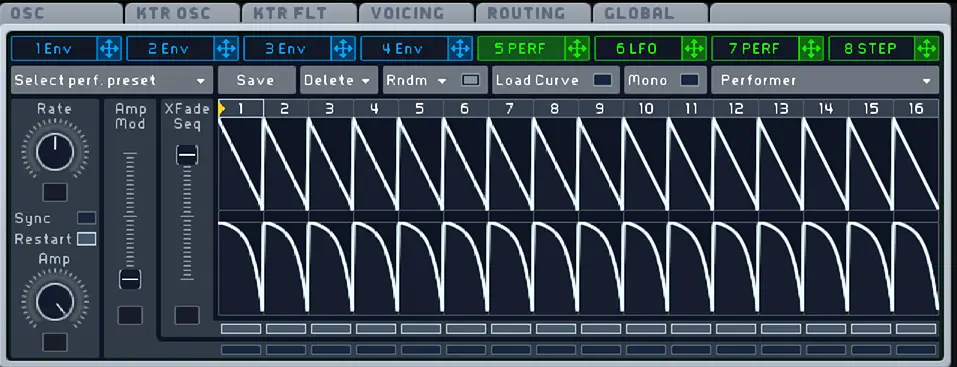
In the Performer tab, down the left hand side there is identical controls for Rate, a Sync option and Amp. These work in the same way as in the LFO tab.
The Performer has 16 “steps”, and Massive allows you to click and drag along the Performer to create you own 16 (or less) bar patterns.
Try dragging your cursor along the Performer to create a custom pattern that your sound will follow. This is a pretty simple section, but there are a few controls within the module I want to point out:
Performer Controls
The XFade Seq slider determines which Performer lane controls your sound.
Along the top bar of the Performer pattern, you can click and drag to make the pattern shorter.
You can set the Performer to start at a certain set by clicking and dragging the yellow arrow in the top bar of the Performer pattern. The pattern will start at the yellow arrow, then cycle through the entire pattern.
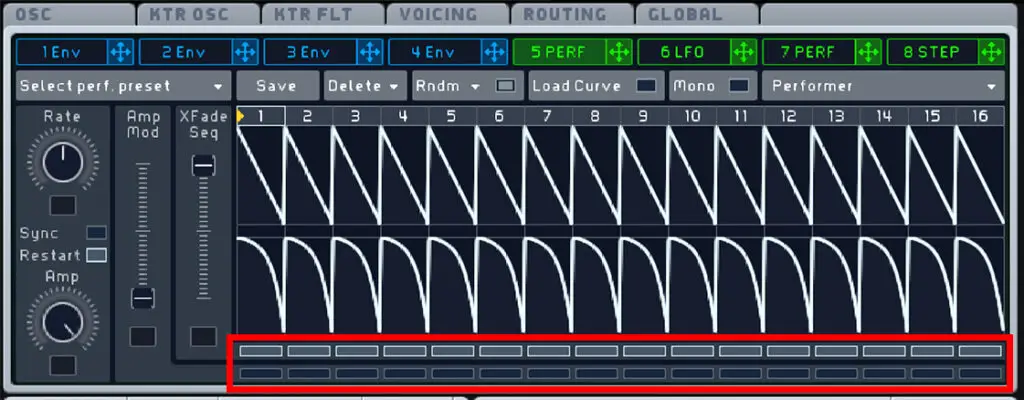
At the bottom of the Performer section, the top row of thin, horizontal boxes can be used to flip between the two patterns. For example, if the top pattern is selected using the XFade Seq slider, un-highlighting certain boxes means that step will play the bottom pattern for that step only.
The bottom row of these boxes follows the Amp Mod slider. For example, if the slider is all the way down, and you highlight one of these boxes, that pattern will be muted as the amp is set to 0.
A lot of these controls you probably won’t need, and you may find more value just utilising one Performer lane. However, this can be a very powerful tool for evolving, modulating synths.
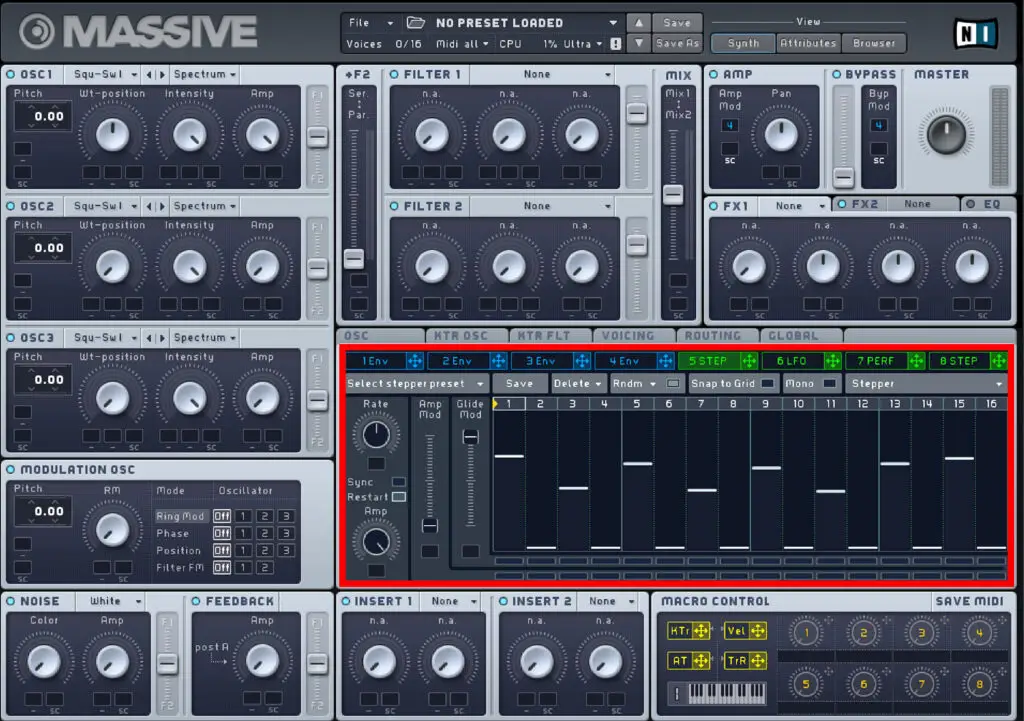
Stepper
The Stepper module works in a similar way to the Performer, but it more effective for creating arpeggios and modulating pitch.
Again, the Rate, Sync and Amp option work in the same way.
You can slide each step to a value between 0 and 12, making it ideal for setting melodies. To do this, drag the green “5 STEP” bar onto the box directly under an oscillators pitch (shown below). Now the stepper will control the pitch of that oscillator.
Stepper controls
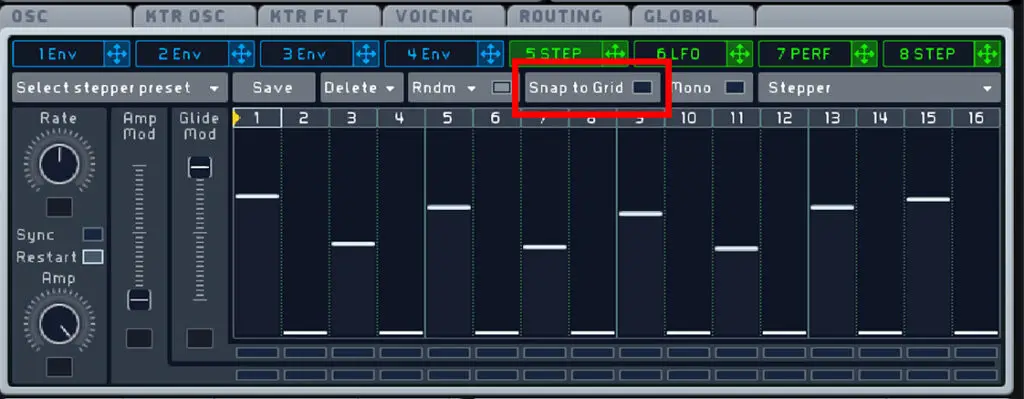
The “snap to grid” option is particularly useful here to snap the steps to exact numerical values.
The Glide Mod slider controls how much “glide” there is between the steps, also known as glide time. You can choose which steps have this glide function by highlighting specific boxes in the top row of thin, horizontal boxes at the bottom of the Stepper module.
The bottom row of thin, horizontal boxes controls whether that step is affected by the Amp Mod slider.
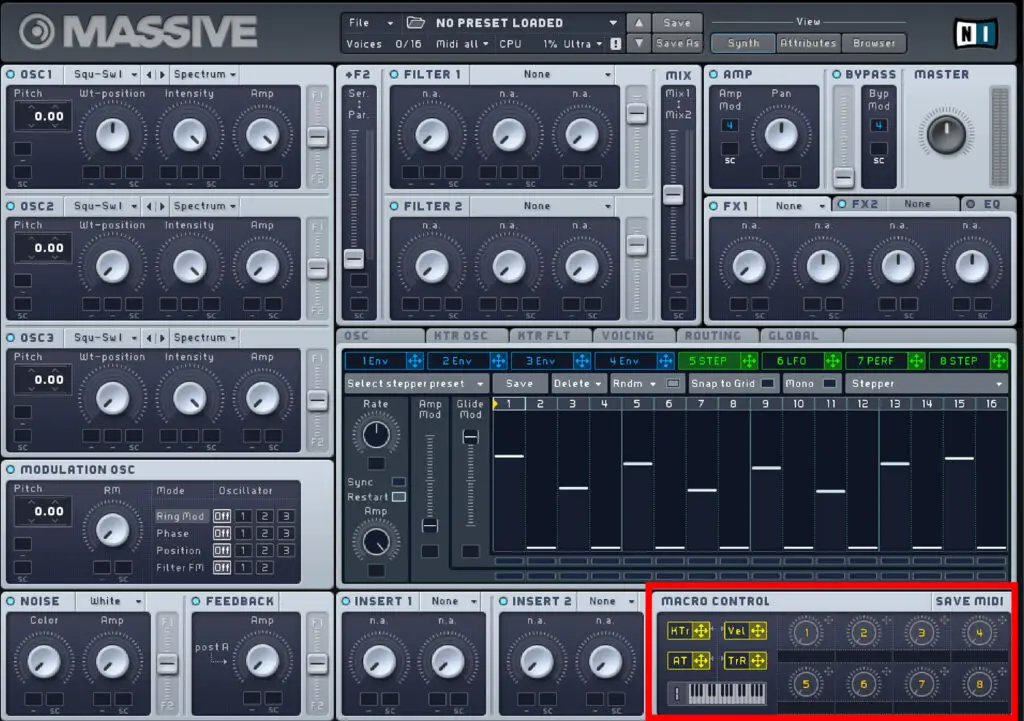
Macro Controls
The macro control section is found in the bottom right of the Massive interface, and can be used to assign your keyboard or MIDI controller to certain parameters.
You’ll notice 8 numbered knobs, all of which can be dragged onto any parameter in Massive in the same way you would with an envelope or LFO.
The first knob is set to vibrato by default, and after applying this to a parameter you can control the vibrato using your keyboard. Right click on a chosen macro control and click Midi Learn to do this.
So if you drag the second macro knob onto your filter cutoff for example using this MIDI learn feature, your controller will affect the cutoff of the filter.
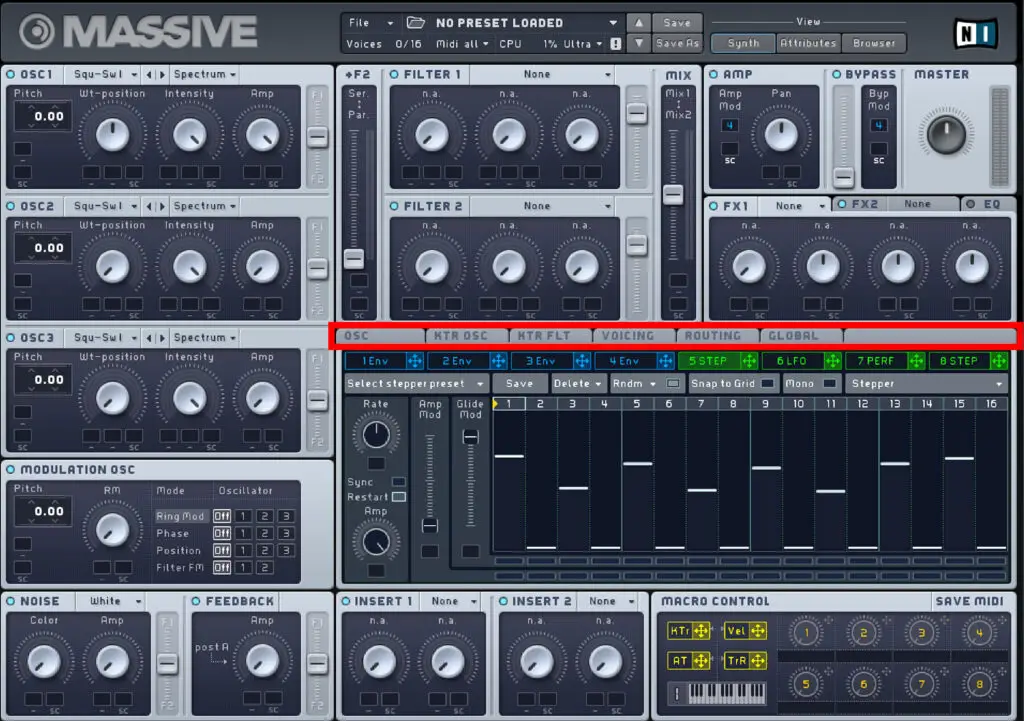
Additional Tabs
There is a row of additional tabs directly above the LFO and envelope section. There are a lot of options here you probably don’t need to worry about as a beginner. However, I thought it was worth pointing out a few key features within these tabs.
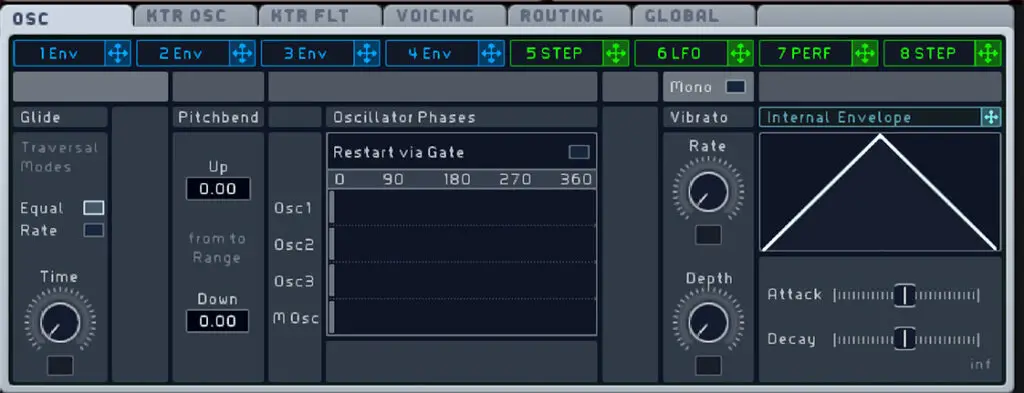
Osc Tab
On the left side of this tab this is a glide section. This is handy for creating legato lead synth and smoothing out your melodies.
The Time knob controls the glide time, or the time it takes Massive to glide between two notes.
If the Equal button is highlighted, all notes will have an equal glide time between them, regardless of the difference in semitones.
When Rate is highlighted, the glide time between notes is affected by how many semitones are between the two notes.
Please note: This glide feature only works in mono mode. To do this, go to the voicing tab and under voicing select either Monophon or Monorotate.
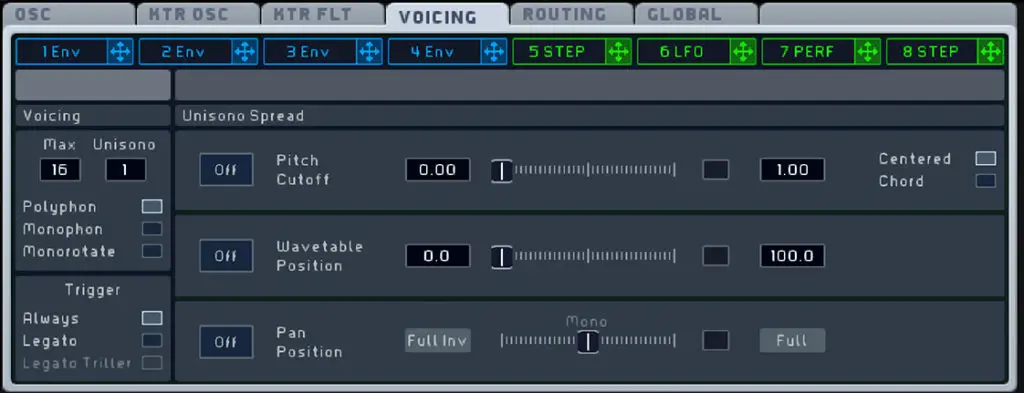
Voicing Tab
Using the draggable Max button, you can set your maximum number of polyphonic voices. Be careful with this though, as more voices will slow down your CPU especially with more complex Massive sounds.
The Unisono button determines how many voices play when you play a single note.
Below this you can choose between Polyphon, Monophon and Monorotate options.
Polyphonic allows you to play multiple notes simultaneously (overlapping melodies or chords), Monophonic allows just one note to be played at a time, and Monorotate is very similar to Monophonic but smooths the transition and removes any clicking noises that may occur between notes.
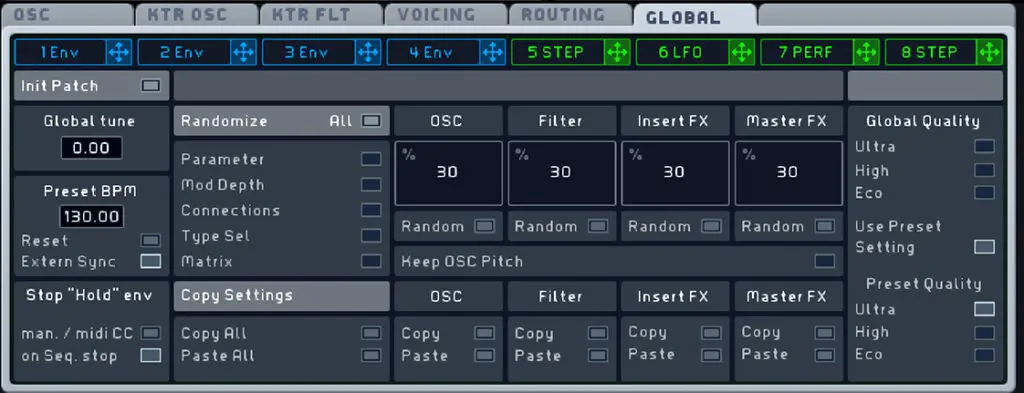
Global Tab
As a beginner, the only thing I would worry about in this tab is the Global Tune option. This determines the pitch of the entire sound within Massive, so it saves you having to change the pitch for each oscillator. However this control cannot be modulated.
And there you have it…
An in-depth tutorial on how to use Massive, from a beginners perspective.
My main advice when it comes to learning soft synths is always the same. Don’t get ultra-specific and focus on tiny details of sound design in Massive. Experiment as much as possible with various different sounds and ideas, focusing on different aspects of Massive’s engine.
I wouldn’t recommend spending hours on one sound to start with. In my opinion, it’s more beneficial to create as many sounds as you can, to gain a much broader understanding of this incredible piece of software. And remember, sometimes the best results come from breaking the rules, so don’t be afraid to try out some weird, unorthodox modulations or effects.
Good luck!

How To Use Massive Review: Similar Articles
How to use Serum (For Beginners)
The 5 Best VST Plugins for Beginners