
FL Studio 20 – How to De-Ess Vocals (THE EASIEST WAY)

For a beginner producer, de-essing (or removing sibilance) can be one of the most infuriating aspects of vocal mixing.
Sibilance is defined as any consonant that requires pushing air past the tongue without closing the mouth at all. In simple terms, it’s ess, sh, z, or ch sounds in vocals that can cause harsh hissing sounds when recorded through a studio mic.
Luckily, sibilance isn’t too hard to remove if you know how.
FL Studio 20 De-essing Vocals – Quick Tips
Before we dive into the easiest way to de-ess vocals in FL Studio 20, here are a few key points to bear in mind when de-essing vocals.
• Sibilance shouldn’t be removed completely, as this gives a very unnatural, unbalanced final sound. You aren’t trying to mute sibilance entirely, you should be lowering the specific peaks so that you are subdueing the harsh “hissing” sound. Vocal tracks with too much de-essing sound very bizarre, and the vocals usually sound muffled and poorly recorded.
• When it comes to de-essing, there is no “one size fits all” setting. Different vocalists and microphone setups will give different sibilance peaks. Generally speaking, a female vocalist will create higher frequency “ess” or “shh” sounds when compared to a male vocalist.
• Remember, don’t only de-ess vocals while listening to the solo’ed vocal track. When de-essing, you should be switching between the solo’ed vocal track and the full track mix. This will reduce the chance of over-doing the de-essing, as it gives you a better idea of how the sibilance sounds within the context of the mix.
• I’d usually recommend putting the plugin used to de-ess your vocals before any other effects in the effect chain. For example, if you add a reverb before the de-essing plugin, the de-essing plugin is going to have to work a lot harder to remove the propagated sibilance.
• As always, take regular breaks when de-essing vocals. When removing sibilance, you can very quickly experience “ear-fatigue” as it is quite an intricate mixing process. So take breaks, and give your ears a rest if you are struggling to achieve your desired final sound.
So, without further ado let’s take a look at the best way to de-ess vocals in FL Studio 20.
How to de-ess in FL Studio 20
There are several methods of de-essing vocals, from dedicated de-esser plugins (such as the incredibly rudimentary Spitfish plugin) to manually reducing each sibilance peak in a vocal track.
From my experience, the best way to de-ess vocal samples is by compressing a specific, narrow EQ band.
This isn’t as complex as it sounds, and FL Studio 20 actually makes this process extremely easy and intuitive.
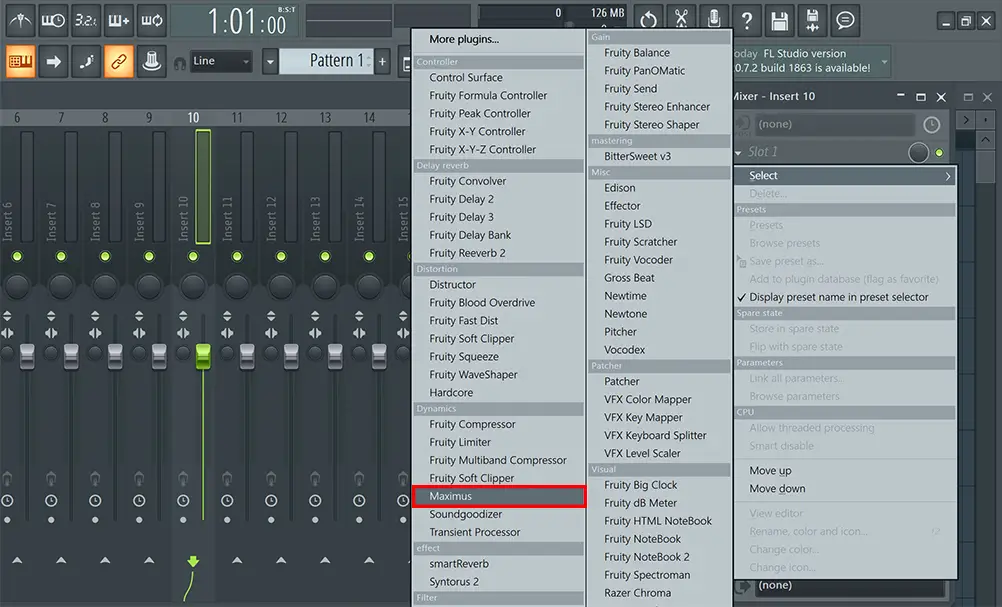
First, load up the Maximus effect plugin in your vocal mixer channel. This is a free stock plugin, and is perfect for de-essing your vocal tracks.
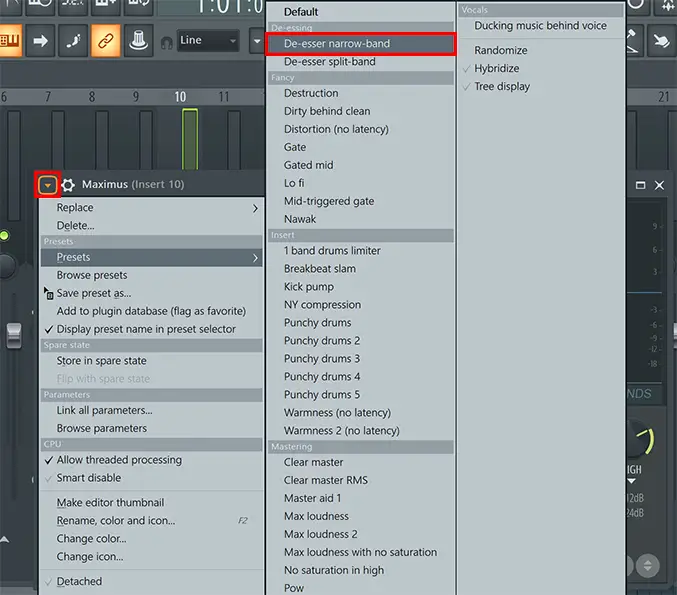
Then, click the very top-left arrow within the Maximus plugin interface, navigate to Presets and select De-esser narrow band.
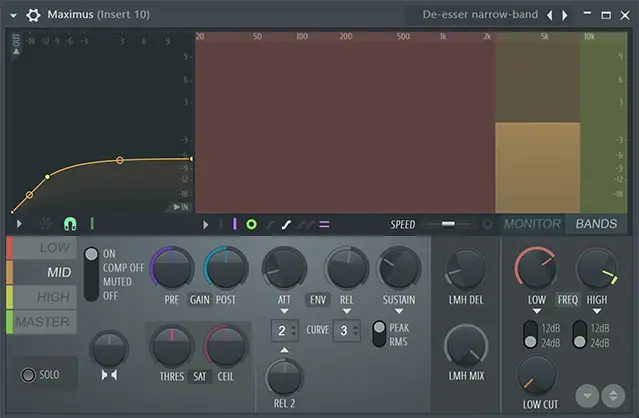
With this preset, you’ll see a larger red section (Low), a yellow section (Mid) with a draggable pre-gain area, and a green area (High). By default, the red and green sections are empty, so these frequency bands are unaffected. We’ll be focusing on the yellow middle area.
Identifying the sibilance band
Now you have a narrow compression band, you need to make sure the yellow mid area is compressing the correct EQ band.

To do this, select the “Show output spectogram” button, this is a small circle next to the Monitor option (show above). When your vocals are playing, you should now be able to see a visual spectogram over the top of the bands.
Now, with your vocal track solo’ed, you should be able to identify where the harsh resonances are occurring when “shh”, “ess”, “ch” or other sibilance sounds are played. Make sure the yellow band encloses this frequency range by dragging the edges of the yellow section so they are on either side of the region the sibilance is occurring.
Now you have a narrow compression band that will only affect the frequencies you want to de-ess. Next it’s time to make sure this area is compressed correctly to smoothly reduce sibilance.
Editing the compression band
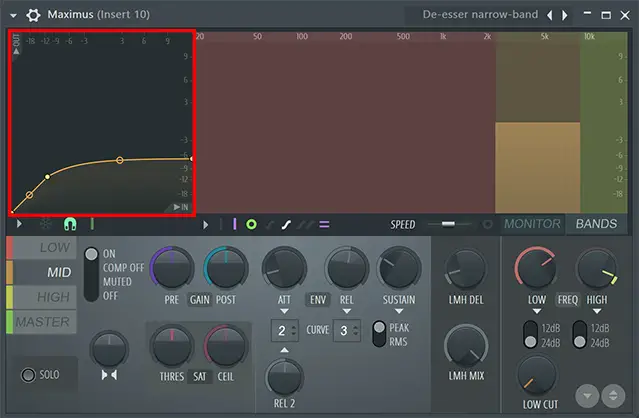
On the left hand side of the plugin, you’ll see a compression field visualizer (shown above). Make sure the Mid section is selected so you are compressing the correct band.
Now, you should see the left-hand visualizer “fill-up” as the sound is playing, with a large increase when sibilance is played.

Theshold (the point shown above) – First, make sure the threshold point is just above the level where normal frequencies are coming in. Almost all non-sibilance frequencies should be occurring below this point. When sibilance occurs, it should rise above this threshold point.
Ratio / point 2 to 3 tension – The next step really depends on the vocal sample itself. By dragging the point on to the right of threshold, and dragging the tension between the two points, you can shape the intensity of the compression on the sibilance. Use your ear to identify the right level of compression to reduce sibilance without muffling the sound too much. You can even add more points in here for a more complex compression pattern.
And there you have it – the easiest way to de-ess vocals in FL Studio 20. This method is perfect for beginners to music production as it is fairly straightforward and highly effective. It’s also great for more advanced producers as it gives a lot of flexibility as opposed to more basic de-esser plugins.

FL Studio 20: How to de-ess vocals: Similar Articles
The Best FL Studio De Esser Plugins
How to make a beat in FL Studio