
How to add + install VST plugins in Fl Studio 20 – Quick Easy Guide (2022)
A lot of beginner producers run into problems when trying to install VST plugins into FL Studio 20. Thankfully, this is an extremely easy process that was made a lot more streamline in the FL Studio 20 update.
So without further ado, let’s look at how to install a plugin, get it loaded up in FL Studio and add it to the plugin database.
The video version…
In the video below we show you how to add and install VST plugins in FL Studio 20. You can either watch this video, or keep scrolling to read the article!
How to add VST plugins in FL Studio 20
1. Download your chosen plugin
There are hundreds of incredible plugins out there for FL Studio. Sites like PluginBoutique have a vast range of incredible, high quality VST instruments, synths, effects and utility plugins. The process of downloading and installing a plugin onto your computer will vary depending on the plugin. But usually it’s a simple .zip or .exe download, and you’ll need to open the downloaded file and follow a quick, simple installation process.
This will install/unpack the plugin onto your computer, now we need to get it into FL Studio 20?
2. Add the VST plugin to FL Studio
To do this, open up FL Studio 20, go to “Add” > “More Plugins” in the menu bar in the top left of the screen. This will bring up the plugin manager within FL Studio 20.
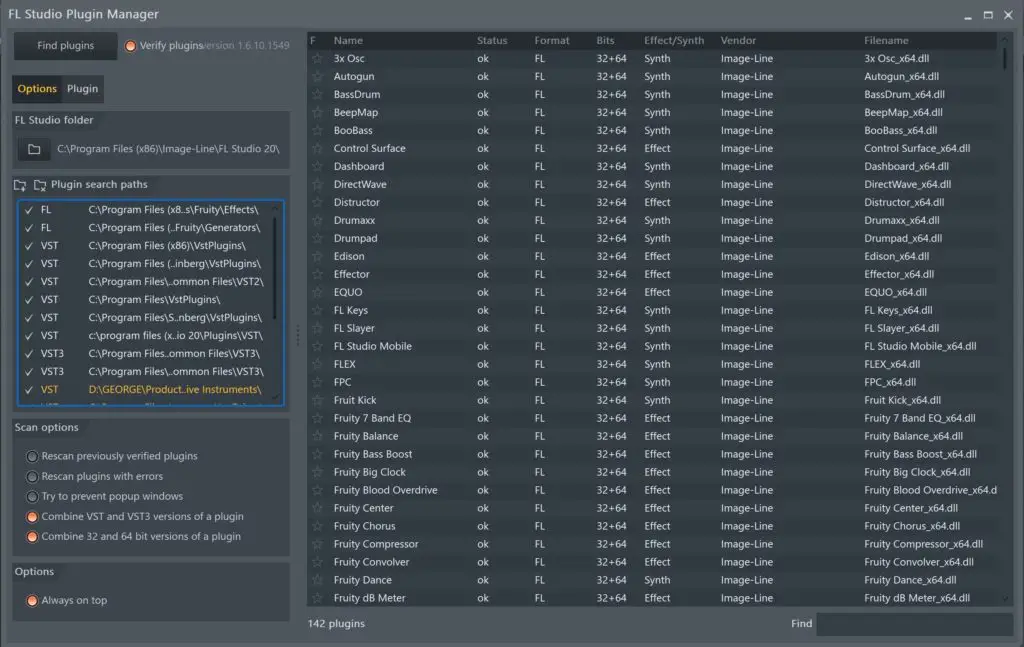
This will bring up a list of all the plugins currently detected on your computer. It’s more than likely your installed plugin won’t show in this list yet.
So click “Manage plugins” at the bottom of the window. This will bring up a separate Plugin Manager window. Click the “Start scan” button at the top left of the window. This will allow FL Studio to search your files for any new plugins on your computer.
Once this is complete, you can search for your chosen plugin using the search bar at the bottom right of the Plugin Manager.
Once you’ve located the plugin in the window, click the tick next to the plugin name so it’s highlighted, and this will add the plugin to FL Studio 20.
3. Load the VST plugin in FL Studio 20
Finally, you need to load the plugin in FL Studio to actually begin using it in your tracks.
Navigate back up to the “Add” section of the menu bar. Within the drop-down list of plugins, you should now see your chosen plugin. Simply click your plugin, and it will load into the FL Studio interface.
There may be an additional step here depending on whether the plugin requires a serial number / activation code. Follow the process specified by the individual plugin to activate.
4. Flag as favourite
This is an additional step for the more organised producers out there. If you want to add a certain plugin to your favourites (the plugin database), navigate to the browser section (left hand side of the screen) and click on “Plugin database”. This will expand the category and you should see “Effects“, “Generators” and “Installed“. Within these folders, select where you’d like to store your plugin, for example “Plugin database > Generators > Synth Classic”.
When this folder is selected, click the arrow in the very top left corner of the plugin window, and navigate to “Add to plugin database (flag as favourite)“.
This will add the plugin to the chosen folder. Click F8 to open the plugin picker, and you should see your plugin within this view.
There you have it, the easiest way to add and install your plugins into FL Studio 20.
For more guides / resources to the best plugins, sample packs on the web, why not check out our most popular articles below.

How to install VST plugins – Fl Studio 20: Similar Articles
The 100 Best FREE VST Plugins of All Time
How to make a beat in FL Studio | Step by Step Guide